

phpMyAdmin is a free PHP-based software utility for administering MySQL databases over the Internet. phpMyAdmin can perform a wide range of MySQL and MariaDB tasks. We’ll go over how to install phpMyAdmin Arch | Manjaro | Garuda Linux in this post.
Developers and database administrators can use PhpMyAdmin to do things like:
- Data can be loaded and exported.
- Control who has access to what information and what permissions they have.
- Build database graphics in PDF.
- Create, modify, and drop a database using InnoDB tables and foreign keys.
- Make and modify tables.
- Look through tables and databases.
- Performing table maintenance.
Features of phpMyAdmin
- Web interface that is easy to use.
- Most MySQL functionalities are supported.
- Query-by-example allows you to create sophisticated queries (QBE).
- Searching a database in its entirety or a subset of it.
- Using a set of predefined methods, such as displaying BLOB data as an image or a download link, you can convert stored data into any format.
- Data can be imported from CSV and SQL files.
- CSV, SQL, XML, PDF, ISO/IEC 26300 – OpenDocument Text and Spreadsheet, Word, LATEX, and other formats are available for export.
- Multiple server administration.
- Creating visuals in multiple formats of your database setup.
Installation Pre-requisites
We’ll need the following items before we can install PhpMyAdmin:
- On your machine, create a database (either MySQL or MariaDB).
- PHP installed.
- A web server (Nginx or Apache).
Install phpMyAdmin on Arch | Manjaro | Garuda Linux
Follow the steps below to install phpMyAdmin.
Step 1: Update your system
First, make sure your system packages are up to date:
sudo pacman -SyuStep 2: Install Apache on Garuda Linux
Run the following command to install Apache on Garuda Linux:
sudo pacman -S apacheAccept the installation prompt to proceed:
resolving dependencies...
looking for conflicting packages...

Packages (3) apr-1.7.5-3  apr-util-1.6.3-2  apache-2.4.62-1

Total Download Size:   2.10 MiB
Total Installed Size:  8.21 MiB

:: Proceed with installation? [Y/n] y
Start and enable apache:
sudo systemctl start httpd
sudo systemctl enable httpd
Ensure that apache is active and running:
$ sudo systemctl status httpd
● httpd.service - Apache Web Server
     Loaded: loaded (/usr/lib/systemd/system/httpd.service; enabled; preset: disabled)
     Active: active (running) since Thu 2025-02-13 11:14:41 EAT; 16s ago
 Invocation: c27d54d68bb74e6184f4cccf22807dbd
   Main PID: 6313 (httpd)
      Tasks: 82 (limit: 7077)
     Memory: 6.5M (peak: 7.2M)
        CPU: 58ms
     CGroup: /system.slice/httpd.service
             ├─6313 /usr/bin/httpd -k start -DFOREGROUND
             ├─6318 /usr/bin/httpd -k start -DFOREGROUND
             ├─6319 /usr/bin/httpd -k start -DFOREGROUND
             └─6320 /usr/bin/httpd -k start -DFOREGROUND

Feb 13 11:14:41 manjaro systemd[1]: Started Apache Web Server.
Feb 13 11:14:41 manjaro httpd[6313]: AH00558: httpd: Could not reliably determine the server's fully qualified domain name, using 127.0.1.1. Set >
Step 3: Install MariaDB on Garuda Linux
For phpMyAdmin database, we are going to install MariaDB. Execute the following command to install MariaDB database:
sudo pacman -S libmariadbclient mariadb mariadb-clientsAccept the installation prompt:
:: There are 2 providers available for libmariadbclient:
:: Repository extra
   1) mariadb-libs  2) mariadb-lts-libs

Enter a number (default=1): 1
resolving dependencies...
looking for conflicting packages...

Packages (4) jemalloc-1:5.3.0-5  mariadb-11.6.2-2  mariadb-clients-11.6.2-2  mariadb-libs-11.6.2-2

Total Download Size:    35.03 MiB
Total Installed Size:  243.53 MiB

:: Proceed with installation? [Y/n] y
Initialize database server using the commands below:
$ sudo mysql_install_db --user=mysql --basedir=/usr --datadir=/var/lib/mysql
/usr/bin/mysql_install_db: Deprecated program name. It will be removed in a future release, use 'mariadb-install-db' instead
Installing MariaDB/MySQL system tables in '/var/lib/mysql' ...
OK

To start mariadbd at boot time you have to copy
support-files/mariadb.service to the right place for your system


Two all-privilege accounts were created.
One is root@localhost, it has no password, but you need to
be system 'root' user to connect. Use, for example, sudo mysql
The second is mysql@localhost, it has no password either, but
you need to be the system 'mysql' user to connect.
After connecting you can set the password, if you would need to be
able to connect as any of these users with a password and without sudo

See the MariaDB Knowledgebase at https://mariadb.com/kb

You can start the MariaDB daemon with:
cd '/usr' ; /usr/bin/mariadbd-safe --datadir='/var/lib/mysql'

You can test the MariaDB daemon with mariadb-test-run.pl
cd '/usr/mariadb-test' ; perl mariadb-test-run.pl

Please report any problems at https://mariadb.org/jira

The latest information about MariaDB is available at https://mariadb.org/.

Consider joining MariaDB's strong and vibrant community:
https://mariadb.org/get-involved/
Check the installed version of Mysql:
$ mariadb -V
mariadb from 11.6.2-MariaDB, client 15.2 for Linux (x86_64) using readline 5.1
Using the following commands, Start and enable MariaDB;
sudo systemctl enable --now mariadb.service
sudo systemctl start mariadb.service
Ensure that mariadb is active and running:
$ systemctl status mariadb.service
● mariadb.service - MariaDB 11.6.2 database server
     Loaded: loaded (/usr/lib/systemd/system/mariadb.service; enabled; preset: disabled)
     Active: active (running) since Thu 2025-02-13 11:19:36 EAT; 11s ago
 Invocation: 94771cd41ec84e8fb1f6d5cf81a7fd3f
       Docs: man:mariadbd(8)
             https://mariadb.com/kb/en/library/systemd/
    Process: 7215 ExecStartPre=/bin/sh -c [ ! -e /usr/bin/galera_recovery ] && VAR= ||   VAR=`/usr/bin/galera_recovery`; [ $? -eq 0 ]   && echo _>
    Process: 7253 ExecStartPost=/bin/rm -f /run/mysqld/wsrep-start-position (code=exited, status=0/SUCCESS)
   Main PID: 7241 (mariadbd)
     Status: "Taking your SQL requests now..."
      Tasks: 12 (limit: 46709)
     Memory: 231.4M (peak: 233.2M)
        CPU: 554ms
     CGroup: /system.slice/mariadb.service
             └─7241 /usr/bin/mariadbd

Feb 13 11:19:35 manjaro mariadbd[7241]: 2025-02-13 11:19:35 0 [Note] InnoDB: log sequence number 47763; transaction id 14
Feb 13 11:19:35 manjaro mariadbd[7241]: 2025-02-13 11:19:35 0 [Note] InnoDB: Loading buffer pool(s) from /var/lib/mysql/ib_buffer_pool
Feb 13 11:19:35 manjaro mariadbd[7241]: 2025-02-13 11:19:35 0 [Note] Plugin 'wsrep-provider' is disabled.
Feb 13 11:19:35 manjaro mariadbd[7241]: 2025-02-13 11:19:35 0 [Note] InnoDB: Buffer pool(s) load completed at 250213 11:19:35
Feb 13 11:19:36 manjaro mariadbd[7241]: 2025-02-13 11:19:36 0 [Note] Server socket created on IP: '0.0.0.0'.
Feb 13 11:19:36 manjaro mariadbd[7241]: 2025-02-13 11:19:36 0 [Note] Server socket created on IP: '::'.
Feb 13 11:19:36 manjaro mariadbd[7241]: 2025-02-13 11:19:36 0 [Note] mariadbd: Event Scheduler: Loaded 0 events
Feb 13 11:19:36 manjaro mariadbd[7241]: 2025-02-13 11:19:36 0 [Note] /usr/bin/mariadbd: ready for connections.
Feb 13 11:19:36 manjaro mariadbd[7241]: Version: '11.6.2-MariaDB'  socket: '/run/mysqld/mysqld.sock'  port: 3306  Arch Linux
Feb 13 11:19:36 manjaro systemd[1]: Started MariaDB 11.6.2 database server.
Securing MariaDB Database Server;
You can now protect your database server by following these steps:
$ sudo mysql_secure_installation

NOTE: RUNNING ALL PARTS OF THIS SCRIPT IS RECOMMENDED FOR ALL MariaDB
      SERVERS IN PRODUCTION USE!  PLEASE READ EACH STEP CAREFULLY!

In order to log into MariaDB to secure it, we'll need the current
password for the root user. If you've just installed MariaDB, and
haven't set the root password yet, you should just press enter here.

Enter current password for root (enter for none): <ENTER>
OK, successfully used password, moving on...

Setting the root password or using the unix_socket ensures that nobody
can log into the MariaDB root user without the proper authorisation.

You already have your root account protected, so you can safely answer 'n'.

Switch to unix_socket authentication [Y/n] y
Enabled successfully!
Reloading privilege tables..
 ... Success!


You already have your root account protected, so you can safely answer 'n'.

Change the root password? [Y/n] y
New password: <ENTER NEW PASSWORD>
Re-enter new password: <RE-ENTER NEW PASSWORD>
Password updated successfully!
Reloading privilege tables..
 ... Success!


By default, a MariaDB installation has an anonymous user, allowing anyone
to log into MariaDB without having to have a user account created for
them.  This is intended only for testing, and to make the installation
go a bit smoother.  You should remove them before moving into a
production environment.

Remove anonymous users? [Y/n] y
 ... Success!

Normally, root should only be allowed to connect from 'localhost'.  This
ensures that someone cannot guess at the root password from the network.

Disallow root login remotely? [Y/n] y
 ... Success!

By default, MariaDB comes with a database named 'test' that anyone can
access.  This is also intended only for testing, and should be removed
before moving into a production environment.

Remove test database and access to it? [Y/n] y
 - Dropping test database...
 ... Success!
 - Removing privileges on test database...
 ... Success!

Reloading the privilege tables will ensure that all changes made so far
will take effect immediately.

Reload privilege tables now? [Y/n] y
 ... Success!

Cleaning up...

All done!  If you've completed all of the above steps, your MariaDB
installation should now be secure.

Thanks for using MariaDB!
Log in to MariaDB database to create a database for phpMyAdmin:
$ mariadb -u root -p
Enter password:
Welcome to the MariaDB monitor.  Commands end with ; or \g.
Your MariaDB connection id is 11
Server version: 11.6.2-MariaDB Arch Linux

Copyright (c) 2000, 2018, Oracle, MariaDB Corporation Ab and others.

Type 'help;' or '\h' for help. Type '\c' to clear the current input statement.

MariaDB [(none)]>
Create phpMyAdmin database:
CREATE DATABASE testdb;Create phpMyAdmin user:
CREATE USER 'testuser'@'%' IDENTIFIED BY 'P@ssw0rd';Remember to replace ‘P@ssw0rd‘ with your password.
Now let’s grant all the privileges to the phpmyadmin database with the following command:
GRANT ALL PRIVILEGES ON *.* TO 'testuser'@'%';We can now flush the privileges using the following command:
FLUSH PRIVILEGES;Exit MariaDB database:
EXIT;
Bye
Step 4: Install PHP on Garuda Linux
We also require PHP. Run the following to install PHP on Garuda Linux:
sudo pacman -S phpNow accept installation as well:
resolving dependencies...
looking for conflicting packages...

Packages (2) oniguruma-6.9.10-1  php-8.3.15-1

Total Download Size:    4.61 MiB
Total Installed Size:  29.62 MiB

:: Proceed with installation? [Y/n] y
:: Retrieving packages...
 php-8.3.15-1-x86_64                                          4.4 MiB  1558 KiB/s 00:03 [###################################################] 100%
 oniguruma-6.9.10-1-x86_64                                  222.3 KiB  42.1 KiB/s 00:05 [###################################################] 100%
 Total (2/2)                                                  4.6 MiB   864 KiB/s 00:05 [###################################################] 100%
(2/2) checking keys in keyring                                                          [###################################################] 100%
(2/2) checking package integrity                                                        [###################################################] 100%
(2/2) loading package files                                                             [###################################################] 100%
(2/2) checking for file conflicts                                                       [###################################################] 100%
(2/2) checking available disk space                                                     [###################################################] 100%
:: Processing package changes...
(1/2) installing oniguruma                                                              [###################################################] 100%
(2/2) installing php                                                                    [###################################################] 100%
:: Running post-transaction hooks...
(1/1) Arming ConditionNeedsUpdate...
Install PHP Extensions:
sudo pacman -S php-apache php-cgi php-fpm php-gd php-embed php-intl php-imap php-redis php-snmp
Installation prompt:
....
Total Download Size:   12.97 MiB
Total Installed Size:  71.60 MiB

:: Proceed with installation? [Y/n] y
If you get an error:
warning: php-8.3.15-1 is up to date -- reinstalling
error: target not found: php-imap
Then you need to install php-imap from the Arch User Repository (AUR).
yay -S php-imapIf you don’t have yay installed, first install it:
sudo pacman -S base-devel git
git clone https://aur.archlinux.org/yay-bin.git
cd yay-bin
makepkg -si
Then, retry installing php-imap:
yay -S php-imapRun the following command to check the installed version of PHP:
$ php -v
PHP 8.3.15 (cli) (built: Dec 17 2024 19:12:24) (NTS)
Copyright (c) The PHP Group
Zend Engine v4.3.15, Copyright (c) Zend Technologies
Now, start and enable php-fpm:
sudo systemctl start php-fpm
sudo systemctl enable php-fpm
Ensure that php-fpm is active and running:
$ sudo systemctl status php-fpm
● php-fpm.service - The PHP FastCGI Process Manager
     Loaded: loaded (/usr/lib/systemd/system/php-fpm.service; enabled; preset: disabled)
     Active: active (running) since Thu 2025-02-13 11:47:50 EAT; 19s ago
 Invocation: 6c46417c18ff4d248af15a0238a67672
   Main PID: 127267 (php-fpm)
     Status: "Processes active: 0, idle: 2, Requests: 0, slow: 0, Traffic: 0.00req/sec"
      Tasks: 3 (limit: 7077)
     Memory: 13.7M (peak: 14.1M)
        CPU: 94ms
     CGroup: /system.slice/php-fpm.service
             ├─127267 "php-fpm: master process (/etc/php/php-fpm.conf)"
             ├─127268 "php-fpm: pool www"
             └─127269 "php-fpm: pool www"

Feb 13 11:47:49 manjaro systemd[1]: Starting The PHP FastCGI Process Manager...
Feb 13 11:47:50 manjaro php-fpm[127267]: [NOTICE] fpm is running, pid 127267
Feb 13 11:47:50 manjaro php-fpm[127267]: [NOTICE] ready to handle connections
Feb 13 11:47:50 manjaro systemd[1]: Started The PHP FastCGI Process Manager.
Feb 13 11:47:50 manjaro php-fpm[127267]: [NOTICE] systemd monitor interval set to 10000ms
Step 5: Install PhpMyAdmin on Garuda Linux
From the official repositories, install the phpMyAdmin package as follows:
sudo pacman -S phpmyadminAccept the installation prompt:
resolving dependencies...
looking for conflicting packages...

Packages (1) phpmyadmin-5.2.2-1

Total Download Size:    7.63 MiB
Total Installed Size:  52.96 MiB

:: Proceed with installation? [Y/n] y
:: Retrieving packages...
 phpmyadmin-5.2.2-1-any                                       7.6 MiB  1082 KiB/s 00:07 [###################################################] 100%
(1/1) checking keys in keyring                                                          [###################################################] 100%
(1/1) checking package integrity                                                        [###################################################] 100%
(1/1) loading package files                                                             [###################################################] 100%
(1/1) checking for file conflicts                                                       [###################################################] 100%
(1/1) checking available disk space                                                     [###################################################] 100%
:: Processing package changes...
(1/1) installing phpmyadmin                                                             [###################################################] 100%
:: Running post-transaction hooks...
(1/1) Arming ConditionNeedsUpdate...
Step 6: Configure phpMyAdmin on Garuda Linux
Create a directory for phpMyAdmin temporary files:
sudo mkdir -p /var/lib/phpmyadmin/tmp
sudo chown -R http:http /var/lib/phpmyadmin/tmp
Make a directory for phpMyAdmin configuration files, such as the htpass file:
sudo mkdir /etc/phpmyadminAfter that, we’ll make a phpMyAdmin setup file:
sudo cp /usr/share/webapps/phpMyAdmin/config.sample.inc.php /usr/share/webapps/phpMyAdmin/config.inc.phpNow edit the configuration file as shown below:
sudo vim /usr/share/webapps/phpMyAdmin/config.inc.phpConfigure the Temp directory and create a secret password of 32 characters:
$cfg['TempDir'] = '/var/lib/phpmyadmin/tmp';
$cfg['blowfish_secret'] = 'Nj9pzCbF^ZGgVxgZ!4pp-%*x4<QDfVFB';
Save the file and exit.
Edit /etc/php/php.ini file and uncomment te following extension=mysqli,extension=curl,extension=iconv:
$ sudo vim /etc/php/php.ini
; If you wish to have an extension loaded automatically, use the following
; syntax:
;
;   extension=modulename
;
; For example:
;
   extension=mysqli
   extension=curl
   extension=iconv
Now create a file called phpmyadmin.conf add the contents below:
sudo vim /etc/httpd/conf/extra/phpmyadmin.confContents:
Alias /phpmyadmin "/usr/share/webapps/phpMyAdmin"
<Directory "/usr/share/webapps/phpMyAdmin">
    DirectoryIndex index.php
    AllowOverride All
    Options FollowSymlinks
    Require all granted
</Directory>
Now, edit /etc/httpd/conf/httpd.conf file and make the following modification:
$ sudo vim /etc/httpd/conf/httpd.conf

#comment the following line using #
#LoadModule mpm_event_module modules/mod_mpm_event.so

#uncomment the following line by removing #
LoadModule mpm_prefork_module modules/mod_mpm_prefork.so

#add the following lines at the end of LoadMudule list
LoadModule php_module modules/libphp.so
AddHandler php-script php

#add the following lines at the end of the file
Include conf/extra/php_module.conf
Include conf/extra/phpmyadmin.conf
Allow http traffic across the firewall:
sudo firewall-cmd --zone=public --add-service http
sudo firewall-cmd --reload
Restart httpd and php-fpm:
sudo systemctl restart httpd
sudo systemctl restart php-fpm
Step 7: Access phpMyAdmin Web Interface
With all of the configuration in place, we can now access phpMyAdmin through a browser at http://<server-ip>/phpmyadmin.
You should get the page below:
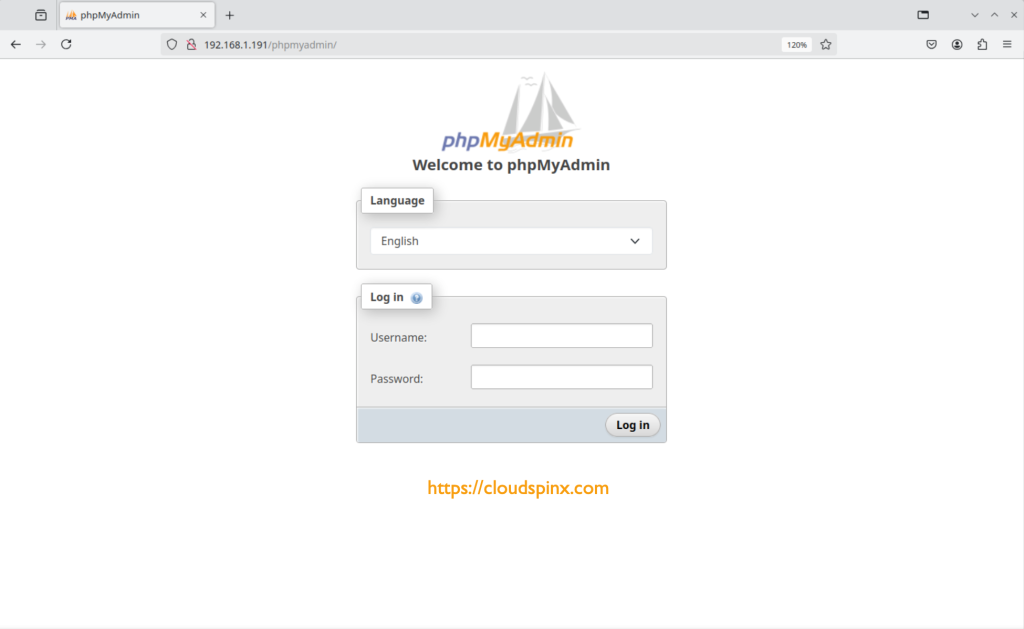
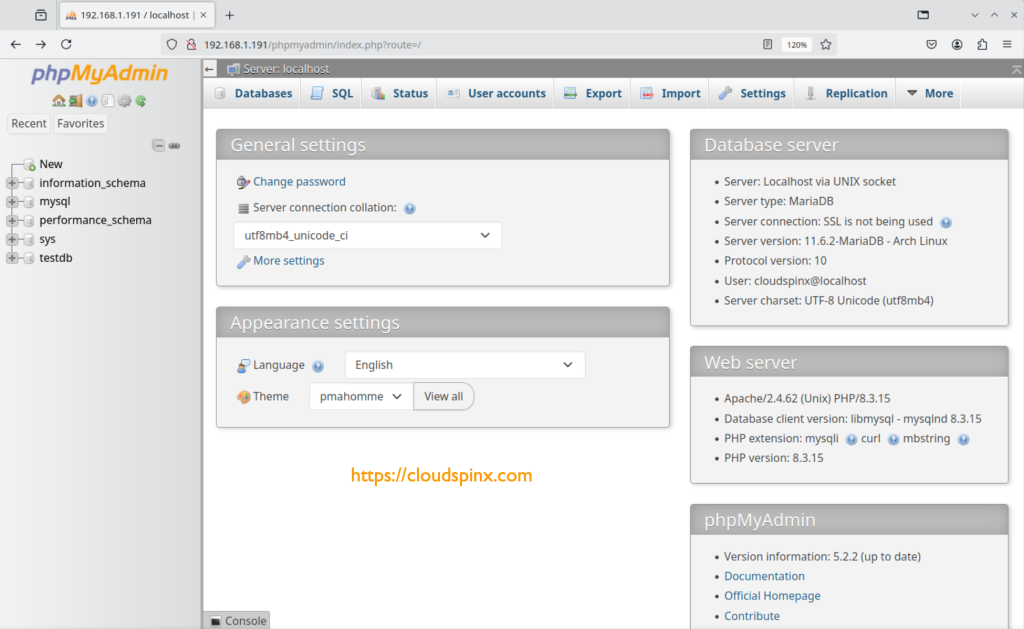
Provide you the login credentials created in MariaDB database. This home page will appear when you have successfully logged in:
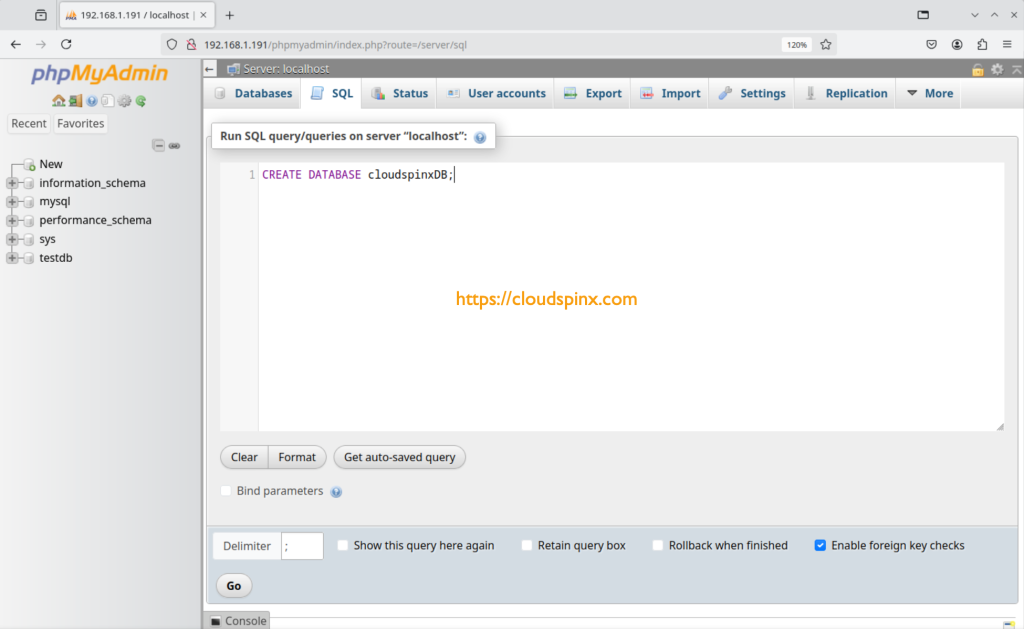
Creating database in phpMyAdmin. Let’s make a database called “clouspinxDB” by going to the SQL tab and typing the command below, then clicking “GO.”
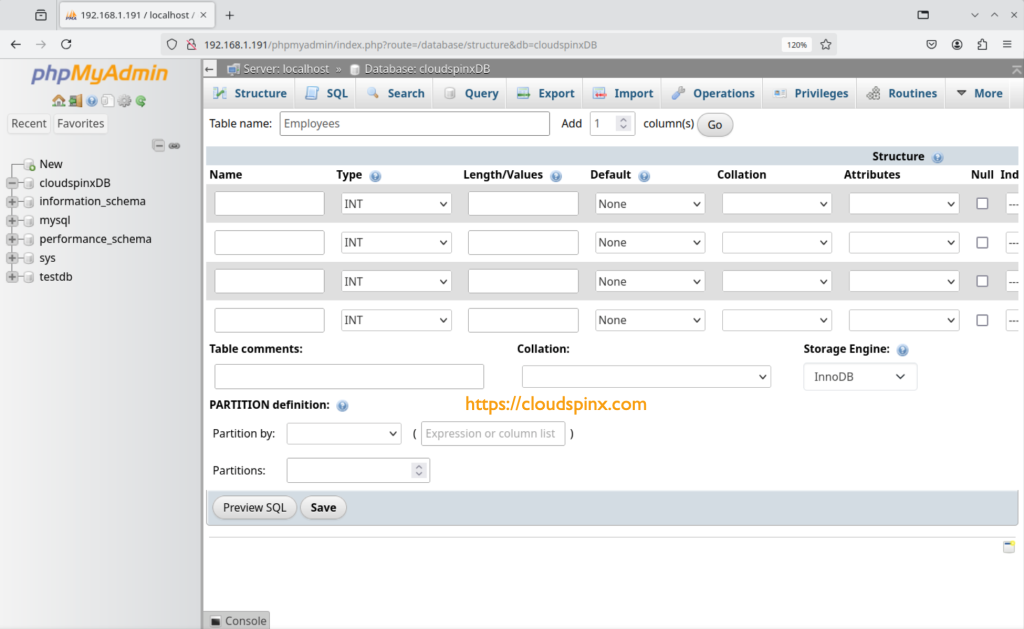
Now we’ll make a table called “Employees” in the previously established database. Select the database from the side panel.
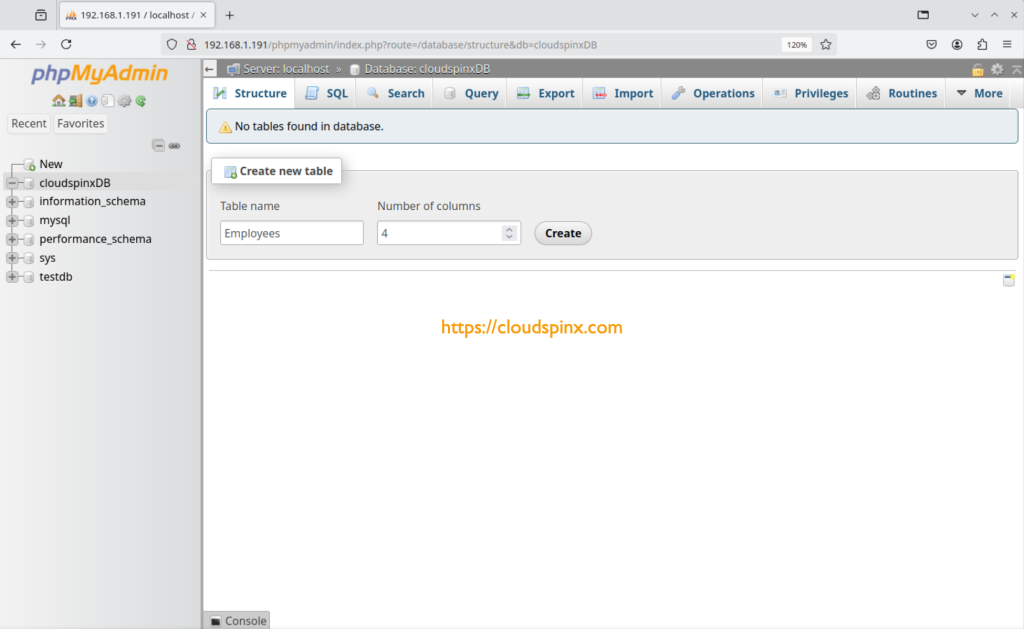
Fill in the table above, then click Save to create the table in the database, cloudspinxDB.
Voila! Enjoy!
Conclusion
We learned how to install and setup phpMyAdmin on Garuda Linux in the preceding post. We used phpWebAdmin to build and edit a database via the web. I hope you found this post useful.
More guides on our site:


