Virtualization is a technology that allows the creation of virtual instances or environments of computer hardware, operating systems, storage devices, or network resources. Instead of running a single physical server or machine for each application or service, virtualization enables multiple virtual machines (VMs) to coexist on the same physical hardware. Each VM operates as if it were a separate, independent entity with its own dedicated resources, providing better resource utilization and isolation.
How Virtualization Works
Virtualization is achieved through a software layer called a “hypervisor” or “virtual machine monitor” (VMM), which sits between the hardware and the operating systems or applications. The hypervisor manages the distribution of resources and ensures that each VM operates independently and securely. This abstraction allows VMs to be easily created, modified and moved across different physical hosts without affecting the underlying hardware.
Types of Virtualization
Type 1 Virtualization and Type 2 Virtualization refer to two different approaches to implementing virtualization, particularly when it comes to hypervisors and their relationship with the underlying hardware and host operating system. Let’s explore each type:
Type 1 Virtualization: Also known as “Bare-Metal” or “Native” virtualization, Type 1 virtualization involves running a hypervisor directly on the physical hardware without the need for an underlying operating system. The hypervisor becomes the first layer of software installed on the server, managing the creation and execution of virtual machines (VMs) directly on the hardware.
Key characteristics of Type 1 Virtualization:
- Efficiency: Since there is no host operating system between the hypervisor and the hardware, Type 1 virtualization tends to be more efficient and lightweight. This results in better performance for VMs.
- Direct Hardware Access: The hypervisor has direct access to the underlying hardware resources, allowing for optimized resource allocation and hardware management.
- Isolation: VMs are isolated from each other and from the host system, enhancing security and stability.
- Examples: Some popular Type 1 hypervisor include VMware vSphere/ESXi, Microsoft Hyper-V Server, and Xen.
Type 2 Virtualization: Type 2 virtualization, also known as “Hosted” virtualization, involves running a hypervisor as an application on top of an existing host operating system. In this setup, the host operating system manages the hardware resources, and the hypervisor runs as a process within the host OS. VMs are created and managed by the hypervisor, which relies on the host OS for certain services.
Key characteristics of Type 2 Virtualization:
- Ease of Deployment: Type 2 virtualization is generally easier to set up and use because it leverages the existing host operating system.
- Less Efficient: Since the hypervisor runs as a process within the host OS, there is an additional layer of abstraction, which can introduce some performance overhead.
- Examples: Common examples of Type 2 hypervisors are Oracle VirtualBox, VMware Workstation, and Parallels Desktop.
Comparison:
The main difference between Type 1 and Type 2 virtualization lies in their relationship with the hardware and host operating system. In Type 1, the hypervisor operates directly on the hardware, while in Type 2, the hypervisor runs as an application within the host OS. This difference impacts factors like performance, resource management, and overall efficiency. Type 1 virtualization is typically favored for production server environments due to its direct access to hardware and better performance, while Type 2 virtualization is often used for desktop virtualization and development/testing scenarios, where ease of use and flexibility are more important.
The VirtualBox Project
VirtualBox is a powerful x86 and AMD64/Intel64 virtualization tool that may be used for both commercial and domestic purposes. VirtualBox is not only the only professional solution that is freely available as Open Source Software in accordance with the terms of the GNU General Public License (GPL) version 3, but it is also a remarkably feature-rich, high-performance service for corporate clients. At the moment, VirtualBox can run on hosts running Linux, Windows, macOS, and Solaris.
Features of VirtualBox 7.1:
- VM configuration logs and saved states for virtual machines can now be fully encrypted (CLI-only for the time being).
- support for guest debugging using KD/WinDbg and GDB, both of which are still quite experimental, has been added.
- Cloud virtual machines can be added and managed with the help of Virtual Machine Manager.
- A new GUI tool that shows information about running guest performance, such as CPU and RAM usage and disk I/O rates, has been added.
- Secure Boot is now supported by EFI.
- EHCI and XHCI, two USB controllers, are now part of the open-source base package.
- Better GUI theme support is now available on all platforms; on Linux and macOS, this is accomplished using a separate implementation on the Windows host.
- For Linux guests, early support for automated Guest Addition upgrades has been put in place.
- It is now possible to wait for and/or reboot the guest when upgrading Guest Additions using VBoxManage.
- Through VirtualBox Guest Additions, guest screen scaling capabilities were enhanced, and several guest Desktop Environments now have some minimal integration.
- There is now new 3D support based on DirectX 11 (and DXVK on non-Windows hosts).
- The addition of devices for virtual TPM 1.2 and 2.0.
Install and Use VirtualBox 7 on Debian 12 (Bookworm)
Before installing VirtualBox on your computer, you must confirm that your processor has virtualization enabled. This is often carried out in BIOS/UEFI installations. To confirm it, enter the command below.
$ lscpu | grep Virtualization
Virtualization:                  VT-x
Virtualization type:             full
Check to see if your system is 64-bit as well;
$ lscpu
Architecture:            x86_64
  CPU op-mode(s):        32-bit, 64-bit
  Address sizes:         46 bits physical, 48 bits virtual
  Byte Order:            Little Endian
CPU(s):                  2
  On-line CPU(s) list:   0,1
Vendor ID:               GenuineIntel
  BIOS Vendor ID:        QEMU
  Model name:            Intel(R) Xeon(R) CPU E5-1650 v3 @ 3.50GHz
    BIOS Model name:     pc-i440fx-6.2  CPU @ 2.0GHz
    BIOS CPU family:     1
    CPU family:          6
    Model:               63
    Thread(s) per core:  1
    Core(s) per socket:  2
    Socket(s):           1
Installing Required Dependencies
VirtualBox requires a few prerequisite items to be installed successfully on your system. Even though the majority of these packages are probably already set up on your Debian system, it’s always a good idea to check. Install by using the following command.
sudo apt install dirmngr ca-certificates software-properties-common apt-transport-https curl -yImporting the GPG Key
The GPG key is a component of a public key cryptography system that confirms the installed packages were obtained from the official VirtualBox repository and are authentic. To import the GPG key, run the command shown below:
curl -fSsL https://www.virtualbox.org/download/oracle_vbox_2016.asc | gpg --dearmor | sudo tee /usr/share/keyrings/virtualbox.gpg > /dev/nullAdding the VirtualBox Repository
Let’s proceed to add the VirtualBox repository to your machine now.
echo "deb [arch=$( dpkg --print-architecture ) signed-by=/usr/share/keyrings/virtualbox.gpg] http://download.virtualbox.org/virtualbox/debian $(lsb_release -cs) contrib" | sudo tee /etc/apt/sources.list.d/virtualbox-7.listNext update the system.
sudo apt updateInstalling VirtualBox 7.1 and Debian Headers
Installing VirtualBox 7.1 and the appropriate Debian headers for the kernel version of your machine comes first. For VirtualBox to work properly, these headers are required. Install VirtualBox 7.1 and the necessary Linux headers by running the following command:
sudo apt install virtualbox-7.1 linux-headers-$(uname -r) -yVerify the installation:
$ sudo apt-cache policy virtualbox-7.1
virtualbox-7.1:
  Installed: 7.1.4-165100~Debian~bullseye
  Candidate: 7.1.4-165100~Debian~bullseye
  Version table:
 *** 7.1.4-165100~Debian~bullseye 500
        500 https://download.virtualbox.org/virtualbox/debian bullseye/contrib amd64 Packages
        100 /var/lib/dpkg/status
     7.1.4-165100~Debian~bookworm 500
        500 http://download.virtualbox.org/virtualbox/debian bookworm/contrib amd64 Packages
Launch & Use VirtualBox on Debian 12
Launching VirtualBox through the desktop environment may be more comfortable for people who prefer a graphical user interface. Go to Activities and type VirtualBox.
Alternatively, you can type VirtualBox on your command line.
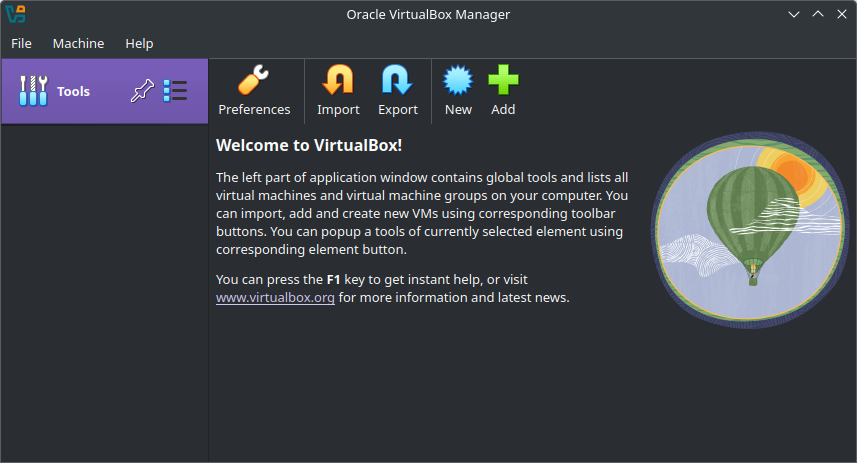
virtualboxAfter launching, this is the default VirtualBox page.
Install VirtualBox Extension Pack
The VirtualBox Extension Pack is a separate downloadable package provided by Oracle that adds additional features and capabilities to the standard VirtualBox installation. It is a proprietary package, which means it is not open source like the core VirtualBox software, but it is free to use for personal, educational, or evaluation purposes. However, for commercial use, a separate licensing arrangement might be required.
Why Use the VirtualBox Extension Pack:
The Extension Pack is used to enhance VirtualBox with extra functionalities that are not included in the open-source version. It provides various features that can improve VM performance, compatibility, and usability. Some common reasons to use the VirtualBox Extension Pack include:
- USB 2.0/3.0 Support: The Extension Pack enables USB 2.0 and USB 3.0 support in VirtualBox, allowing VMs to access USB devices like external hard drives, printers, scanners, and more.
- VirtualBox Remote Desktop Protocol (VRDP): With VRDP, you can access VMs remotely using a Remote Desktop Protocol (RDP) client, making it convenient for remote administration and usage.
- Intel PXE Boot ROM: The Extension Pack includes the Intel PXE Boot ROM, which enables network booting of VMs using the Preboot Execution Environment (PXE).
- VirtualBox Encryption: It allows you to encrypt VM disk images, providing an additional layer of security for sensitive data.
- Host Webcam Passthrough: The Extension Pack supports passing through the host system’s webcam to the guest VM, enabling applications in the VM to use the webcam.
- Disk Image Encryption: You can encrypt virtual disk images in VirtualBox, safeguarding your data even if the VM files are accessed externally.
Features of the VirtualBox Extension Pack:
The specific features included in the Extension Pack can vary based on the version, but some typical features include:
- Virtual USB 2.0/3.0 Controller
- VirtualBox Remote Desktop Protocol (VRDP) support
- Intel PXE Boot ROM with E1000 support
- Host Webcam Passthrough
- VirtualBox Disk Image Encryption
- VirtualBox Virtual Disk Image (VDI) resizing and encryption
- VRDP Authentication using MS-Logon I and II methods
- Host Interface Networking (Windows host only)
- VirtualBox NDIS6 Bridged Networking Driver (Windows guest only)
- USB 3.0 and xHCI (eXtensible Host Controller Interface) Controller support
Downloading the VirtualBox 7.1 Extension Pack
The VirtualBox version that is installed on your Debian system must be compatible with the Extension Pack version that you download. Use the following command to find your VirtualBox version:
vboxmanage -v | cut -dr -f1You can use the wget command to continue downloading the relevant Extension Pack:
wget https://download.virtualbox.org/virtualbox/7.1.x/Oracle_VirtualBox_Extension_Pack-7.1.x.vbox-extpackInstalling the VirtualBox 7.1 Extension Pack
Use the vboxmanage command to set up the Extension Pack that you just downloaded. You will be prompted to accept Oracle’s licensing terms and conditions during this installation process. Enter “y” and only that to indicate your agreement.
sudo vboxmanage extpack install Oracle_VirtualBox_Extension_Pack-7.1.x.vbox-extpackGo ahead and verify installed VirtualBox’s extension pack version by running the following:
$ vboxmanage list extpacks
Extension Packs: 1
Pack no. 0:   Oracle VirtualBox Extension Pack
Version:        7.1.4
Revision:       165100
Edition:
Description:    Oracle Cloud Infrastructure integration, Host Webcam, VirtualBox RDP, PXE ROM, Disk Encryption, NVMe, full VM encryption.
VRDE Module:    VBoxVRDP
Crypto Module:  VBoxPuelCrypto
Usable:         true
Why unusable:
Alternatively, you can install the extension package directly from virtualbox:
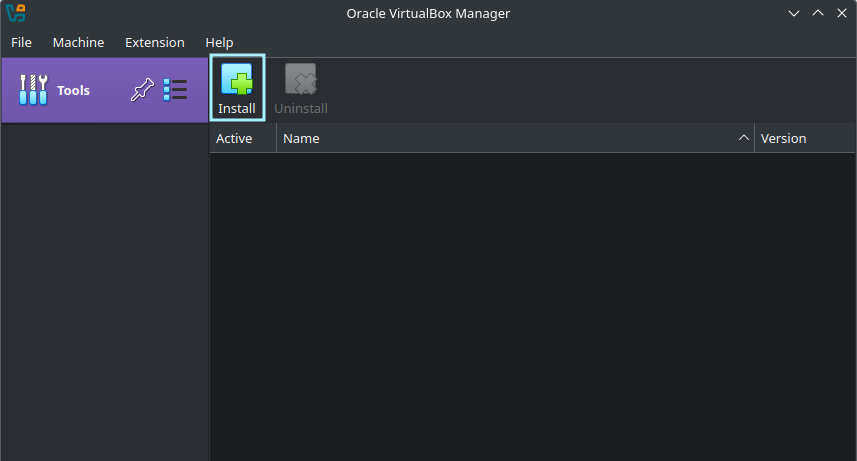
Open the “File” tab in VirtualBox and select the “Tools” option. Next, choose “Extension Pack Manager” from the menu:
Select the “Install” icon to install the Extension pack.
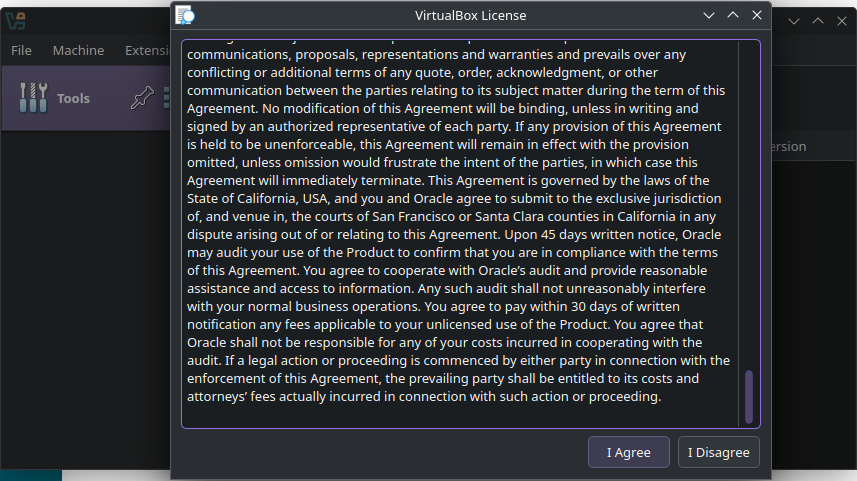
Navigate to where you installed the extension pack and open it. You will see the below window.
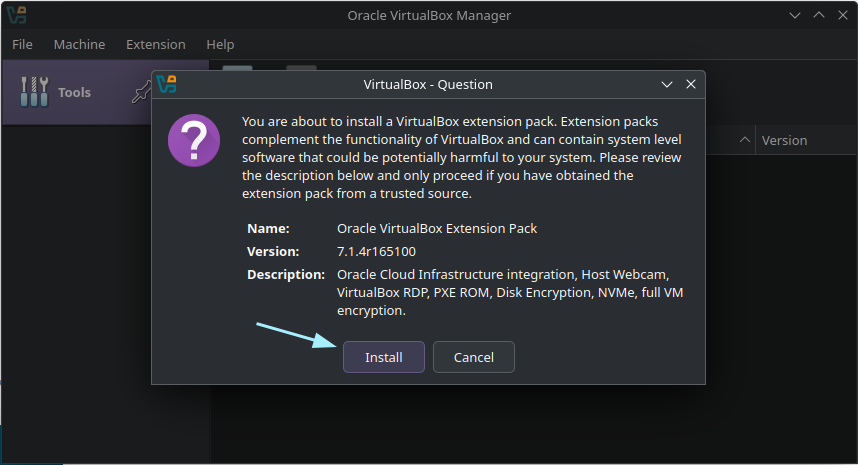
Once you have read the license agreement for VirtualBox and clicked the “I Agree” button, the installation process will begin. After it is finished, wait:
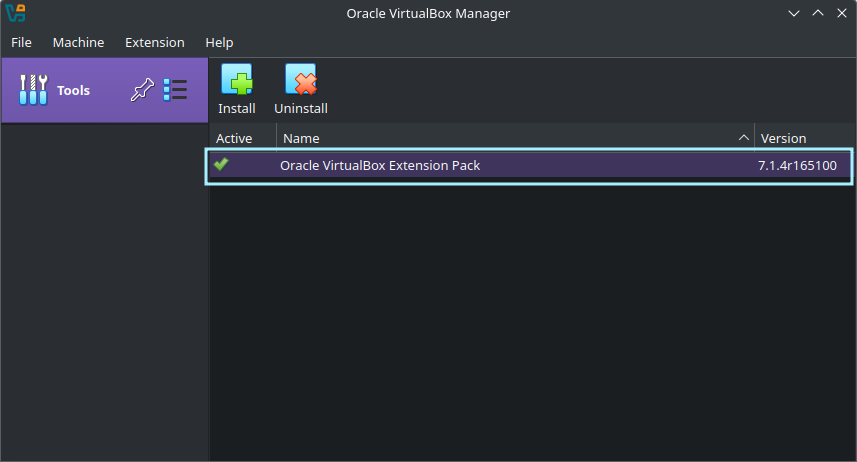
The extension pack will become active after installation:
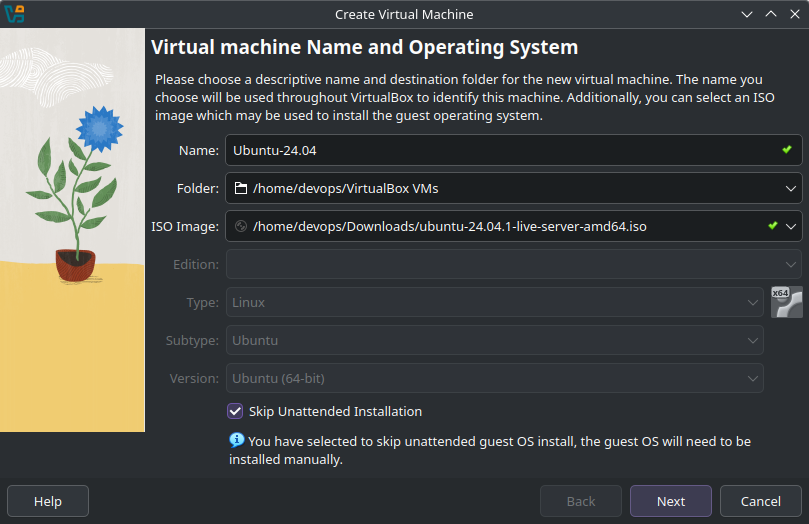
Creating VM in VirtualBox
To create a VM in VirtualBox, Click “New” and enter the name of the machine you wish to create and the necessary details below. Then click Next.
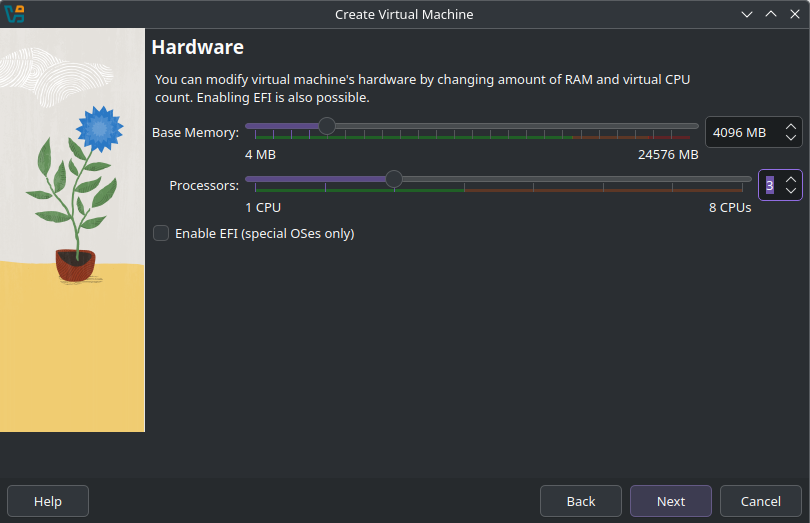
Configure the RAM for the VM. You can choose whichever RAM you want, however for the system to perform properly, we recommend using 4GB of RAM and 2 cores or more.
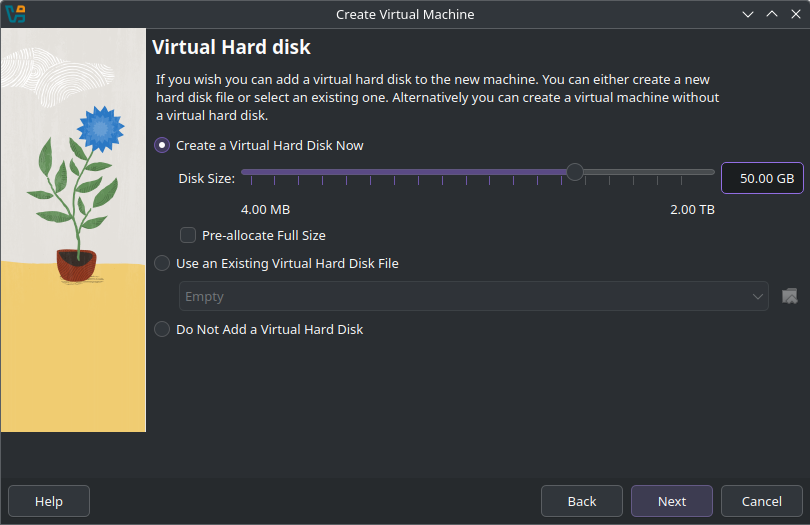
Now, assign space based on your needs (e.g., 50GB) and create the virtual machine .
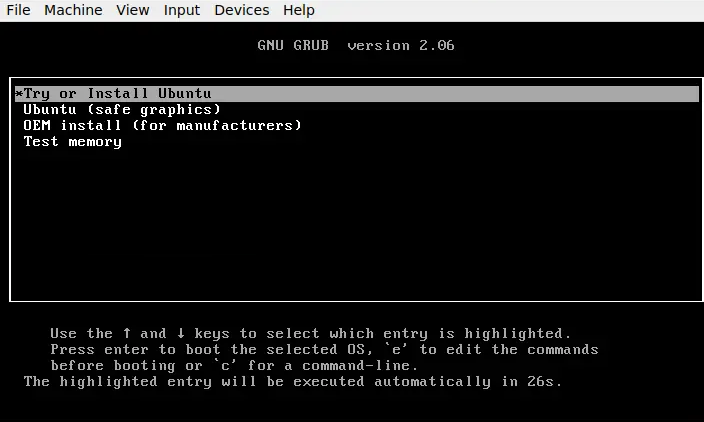
Click on Finish in the next page and then start the machine to begin its installation.
In conclusion, VirtualBox is an excellent choice for running virtual machines due to its ease of use, cross-platform support, compatibility, and feature set. Whether for testing, development, or educational purposes, VirtualBox remains a popular virtualization solution. However, as technology evolves, users should always consider other virtualization options available to ensure they select the best tool for their specific needs.
Watch out for out next article on Using VirtualBox Extensions Pack.
For all your Linux Infrastructure and open source consultations, please visit our official website Cloudspinx.

