Zimbra Collaboration Suit (ZCS) is an open-source collaborative suite providing an email server and a web client. Among other services provided by ZCS are IMAP, POP, SMTP, calendar, chat, tasks and video conferencing. Zimbra collaboration suit comes it two editions; the open-source free edition and the enterprise edition. In this guide, we are going to look at how to install Zimbra Collaboration Suite 8.x on Oracle Linux 8|AlmaLinux 8.
Zimbra Mail Server Installation Requirements
Before beginning your installation, ensure that you the below requirements for your Zimbra environment.
- At least 8GB RAM free and 4 VCPUs
- Not less than 10GB free on /opt
- A fully qualified domain name for your Zimbra server
- A properly resolving A and MX records for your Zimbra server IP address and domain name (Meaning you should have a working DNS server)
- A static IP address for Zimbra server
Step 1: Update your system
Before beginning your Zimbra server installation, ensure that your system is running the latest updates
sudo yum update -yAfter the updates, it is highly recommended to restart your server for the new changes to take effect.
sudo rebootStep 2: Prepare your Zimbra server
Set server hostname and add the server IP address and hostname to /etc/hosts file.
$ sudo hostnamectl set-hostname zimbra.cloudspinx.com
$ sudo vim /etc/hosts
62.15.116.167 zimbra.cloudspinx.com
Query Zimbra server IP address to be resolving properly
 $ dig A zimbra.cloudspinx.com
 ; <<>> DiG 9.11.3-1ubuntu1.3-Ubuntu <<>> A zimbra.cloudspinx.com @127.0.0.1
 ;; global options: +cmd
 ;; Got answer:
 ;; ->>HEADER<<- opcode: QUERY, status: NOERROR, id: 14888
 ;; flags: qr aa rd ra; QUERY: 1, ANSWER: 1, AUTHORITY: 0, ADDITIONAL: 1
 ;; OPT PSEUDOSECTION:
 ; EDNS: version: 0, flags:; udp: 4096
 ;; QUESTION SECTION:
 ;zimbra.cloudspinx.com.    IN  A
 ;; ANSWER SECTION:
 zimbra.cloudspinx.com. 0    IN  A   62.15.116.167
 ;; Query time: 0 msec
 ;; SERVER: 127.0.0.1#53(127.0.0.1)
 ;; WHEN: Mon Apr 01 21:58:39 CEST 2019
 ;; MSG SIZE  rcvd: 73
Confirm that the server MX records are resolving accordingly using dig command.
$ dig MX cloudspinx.com
 ; <<>> DiG 9.11.3-1ubuntu1.3-Ubuntu <<>> MX zimbra.cloudspinx.com @127.0.0.1
 ;; global options: +cmd
 ;; Got answer:
 ;; ->>HEADER<<- opcode: QUERY, status: NOERROR, id: 25343
 ;; flags: qr aa rd ra ad; QUERY: 1, ANSWER: 1, AUTHORITY: 0, ADDITIONAL: 2
 ;; OPT PSEUDOSECTION:
 ; EDNS: version: 0, flags:; udp: 4096
 ;; QUESTION SECTION:
 ;zimbra.cloudspinx.com.    IN  MX
 ;; ANSWER SECTION:
 zimbra.cloudspinx.com. 0    IN  MX  0 zimbra.cloudspinx.com.
 ;; ADDITIONAL SECTION:
 zimbra.cloudspinx.com. 0    IN  A   62.15.116.167
 ;; SERVER: 127.0.0.1#53(127.0.0.1)
 ;; WHEN: Mon Apr 01 21:59:40 CEST 2019
 ;; MSG SIZE  rcvd: 117
Step 3: Install Zimbra 8.8 Server
In our guide, we are going to install the free open-source ZCS, version 8.8.15. Download it to your server using the below command
wget https://files.zimbra.com/downloads/8.8.15_GA/zcs-8.8.15_GA_3953.RHEL8_64.20200629025823.tgzExtract the archived file using the command below
tar xvzf zcs-8.8.15_GA_3953.RHEL8_64.20200629025823.tgzWhen it finishes extracting you will notice a directory added containing Zimbra installation file, switch to the directory.
cd zcs-8.8.15_GA*/Install Zimbra Mail Server on Oracle 8 | Alma | Rocky 8 Linux
To install Zimbra server, change to the /opt and to the zimbra directory and run the below command to begin zimbra installation.
sudo ./install.shAgree to the terms of software license agreement by typing Y and pressing Enter.
Zimbra installation will continue and you will be prompted to use Zimbra Package Repository. Type Y and press Enter
Use zimbra’s package repository YAfter a while you will be prompted to choose Zimbra packages to install as below. Type Y to choose a package for installation and N to reject.
Install zimbra-ldap Y
Install zimbra-logger Y
install zimbra-mta Y
Install zimbra-dnscache Y
Install zimbra-snmp Y
Install zimbra-store Y
Install zimbra-apache Y
Install zimbra-spell Y
Install zimbra-memcached Y
Install zimbra-proxy Y
Install zimbra-drive Y
Install zimbra-imapd (BETA – for evaluation only) N
Install zimbra-chat Y
Agree to the system being modified
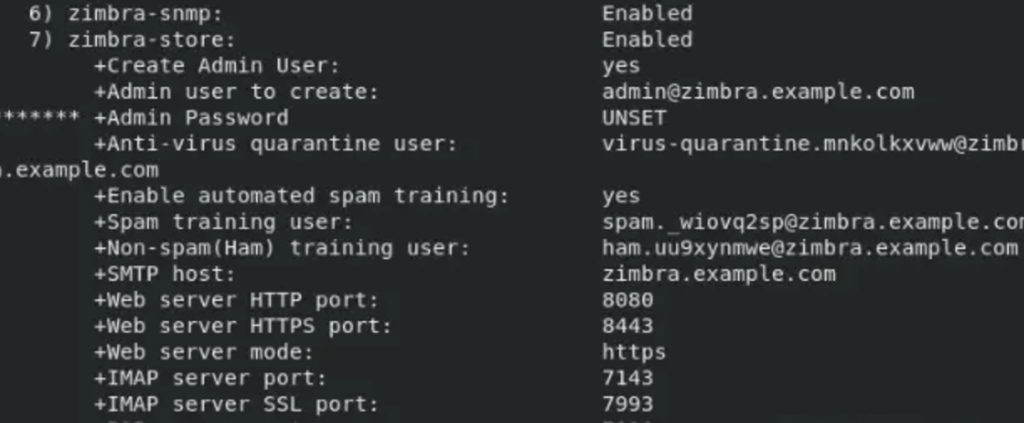
The system will be modified. Continue? [N] YThe next prompt will be to set Zimbra admin password. Select the appropriate number to configure as shown below.

Enter the number to comfigure. For my case, it is 7. Input 7 and press Enter.
Address unconfigured (**) items (? - help) 7The next number to be configured is 4.

Enter 4 to set Zimbra Admin password
select, or ‘r’for previous menu (r) 4After setting your Zimbra Admin password,enter r to go back to the previous menu then a to save the configurations. The steps are as shown:

After entering Yes and clicking Enter, your zimbra installation will continue to completion.
Once the installation is done, access Zimbra mail server from your browser. Type http://<your-server-ip/ fqdn>. If properly installed, you should see a page as below. You should be able to login with the user admin and the admin password that you set above

How to check zimbra services status
To check whether all Zimbra services are running, go back to your terminal and issue the below commands:
sudo su - zimbra -c "zmcontrol status"You should see an output as below when all services are running.
Host zimbra.techviewleo.com
        amavis                  Running
        antispam                Running
        antivirus               Running
        dnscache                Running
        ldap                    Running
        logger                  Running
        mailbox                 Running
        memcached               Running
        mta                     Running
        opendkim                Running
        proxy                   Running
        service webapp          Running
        snmp                    Running
        spell                   Running
        stats                   Running
        zimbra webapp           Running
        zimbraAdmin webapp      Running
        zimlet webapp           Running
        zmconfigd               Running
You can restart all zimbra services by issue the command below as zimbra user
sudo su - zimbra -c "zmcontrol restart"This has been a step-by-step guide on how to install zimbra collaboration suite free edition on Oracle Linux 8|AlmaLinux 8. Enjoy using your Zimbra mail server! Check below more interesting guides for your Linux installations:


