You may install and use Puppet Server 8 on Debian 12 by following the instructions in this article. Automation in applications and infrastructure is critical, and agility, dependability, and affordability are required in today’s IT systems. It has the ability to greatly improve overall business outcomes as a critical component of DevOps, IT operations, and development processes. Let’s learn more about puppets below:
What is Puppet?
One technique for controlling several servers is called Infrastructure as Code (IaC), or Puppet. Primarily written in Ruby, Puppet runs on a variety of Unix-like platforms and is also compatible with Windows. Considering that the software was first released in 2005, it is extremely advanced. Puppet is available as free, open-source software and, for more complicated infrastructures, a proprietary version.
Puppet Architecture:
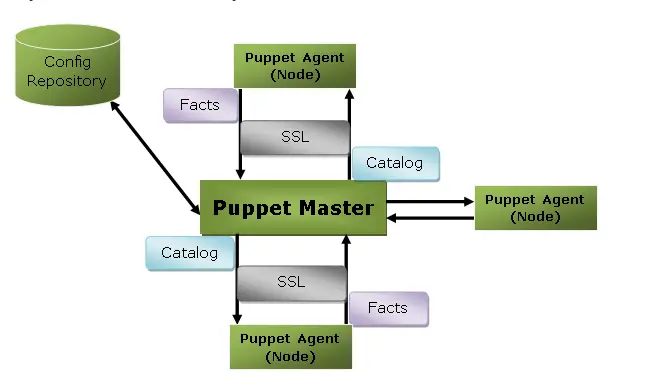
Puppet is based on master-slave or client-server architecture. A secured socket layer called SSL connects the puppet client and server. The system is driven by models. In this case, the server is called a Puppet master, and the client is called a Puppet agent, slave, or node.

Let us see a few Puppet terminologies.
- Puppet Master – The Puppet Master is a daemon that runs on a separate server. As a server node, it is the source of information and the configuration authority.
- Puppet Agents – The Puppet Agent is a daemon that runs on a system or node. Agents on the node require specific permissions to apply configuration catalogs fetched from the Puppet Master.
- Manifest – These are collections of instructions that specify the desired state of a system and are expressed in the DSL, the domain-specific language of Puppet.
- Catalog – An assembled collection of resources and Puppet manifests that symbolize the ideal setup for a certain node.
- Module – Grouping of files, classes, and manifests that are arranged in a directory structure for use with Puppet code.
- Puppet DSL – It is the language used to write Puppets manifest.
- Facts – Its key-value data pair is facts. It contains data about the node or master machine, for instance, the operating system, network interface, IP address, and so on.
Setup Pre-requisites:
- 2 Debian 12 systems – Master & Agent
- 2-4 processor cores.
- 4GB RAM and above
- At least 10GB of disk space
- sudo access
Installation of Puppet Server 8 on Debian 12 Bookworm
One of the two Debian 12 servers will function as the Puppet master/server, while the other will serve as the Puppet agent/client.
| Hostname | IP Address | Task |
| pmaster.example.com | 192.168.200.10 | Puppet server |
| pagent.example.com | 192.168.200.11 | Puppet Agent |
Let’s get started!
Step 1. Update the System
Ensure that your Linux system is updated before beginning Puppet installation
sudo apt updateIt is a recommended habit to reboot your machine after upgrading because kernel upgrades are sometimes installed.
[ -e /var/run/reboot-required ] && sudo rebootStep 2. Configure the hostnames
Here you should set static hostnames on both servers as shown below.
##On the Puppet Server
sudo hostnamectl set-hostname pmaster.example.com --static

##On the Puppet agent
sudo hostnamectl set-hostname pagent.example.com --static
As seen below, add the hostnames to the list of recognized hosts on both servers.
$ sudo vim /etc/hosts
192.168.200.10 pmaster.example.com pmaster
192.168.200.11  pagent.example.com
Now, proceed to the next step.
Step 3. Add Puppet 8 Repositories
Although Puppet can be found in the standard Debian repositories, the versions that are accessible are outdated. See the Puppet version that is currently available below.
$ sudo apt-cache show puppet | grep Version
Version: 7.23.0-1
The aforementioned output shows that the default Puppet version is 7.23.0-1. Now, in this demo, we need to install version 8 of Puppet, so add the repository below on both the master and agent to provide Debian 12 packages.
wget wget https://apt.puppet.com/puppet8-release-bullseye.deb
sudo dpkg -i puppet8-release-bullseye.deb
You’ve successfully added a repo on Debian 12.
Step 4. Install Puppet Server 8
After adding the repositories, use the following command to install Puppet Server on the Debian 12 master node.
sudo apt update && sudo apt install puppetserverHere is the sample output:
Building dependency tree... Done
Reading state information... Done
The following additional packages will be installed:
  ca-certificates-java java-common net-tools openjdk-17-jre-headless puppet-agent
Suggested packages:
  default-jre fonts-ipafont-gothic fonts-ipafont-mincho fonts-wqy-microhei | fonts-wqy-zenhei fonts-indic
The following NEW packages will be installed:
  ca-certificates-java java-common net-tools openjdk-17-jre-headless puppet-agent puppetserver
0 upgraded, 6 newly installed, 0 to remove and 10 not upgraded.
Need to get 154 MB of archives.
After this operation, 422 MB of additional disk space will be used.
Do you want to continue? [Y/n] y
Now, verify the version installed:
$ sudo  apt policy puppetserver
puppetserver:
  Installed: 8.2.3-1bullseye
  Candidate: 8.2.3-1bullseye
  Version table:
 *** 8.2.3-1bullseye 500
        500 http://apt.puppet.com bullseye/puppet8 amd64 Packages
        500 http://apt.puppet.com bullseye/puppet8 all Packages
        100 /var/lib/dpkg/status
     8.2.1-1bullseye 500
        500 http://apt.puppet.com bullseye/puppet8 amd64 Packages
        500 http://apt.puppet.com bullseye/puppet8 all Packages
     8.2.0-1bullseye 500
        500 http://apt.puppet.com bullseye/puppet8 amd64 Packages
        500 http://apt.puppet.com bullseye/puppet8 all Packages
     8.1.0-1bullseye 500
        500 http://apt.puppet.com bullseye/puppet8 amd64 Packages
        500 http://apt.puppet.com bullseye/puppet8 all Packages
     8.0.0-1bullseye 500
        500 http://apt.puppet.com bullseye/puppet8 amd64 Packages
        500 http://apt.puppet.com bullseye/puppet8 all Packages
     7.9.5-2 500
        500 http://deb.debian.org/debian bookworm/main amd64 Packages
JVM Memory Allocation (optional)
Adjust the memory allocation on the JAVA_ARGS option if your machine has less memory than 4GB available:
$ sudo vim  /etc/default/puppetserver
......
JAVA_ARGS="-Xms1g -Xmx1g ...."
Next, start and enable Puppet Server.
sudo systemctl start puppetserver
sudo systemctl enable puppetserver
At this point, Puppet should be running.
$ systemctl status puppetserver
● puppetserver.service - puppetserver Service
     Loaded: loaded (/lib/systemd/system/puppetserver.service; enabled; preset: enabled)
     Active: active (running) since Mon 2023-11-06 13:58:52 EAT; 34s ago
   Main PID: 5628 (java)
      Tasks: 54 (limit: 4915)
     Memory: 1.6G
        CPU: 46.769s
     CGroup: /system.slice/puppetserver.service
             └─5628 /usr/bin/java --add-opens java.base/sun.nio.ch=ALL-UNNAMED --add-opens java.base/java.io=ALL-UNNAMED -Xms2g -Xmx2g -Djruby.logger.class=com.puppetlabs.jruby_utils.jruby.Slf4jLogger -Dlogappe>

Nov 06 13:58:25 puppet.master-node systemd[1]: Starting puppetserver.service - puppetserver Service...
Set the values for dns_alt_names, server name, and ca_server.
sudo vim /etc/puppetlabs/puppet/puppet.confAdd the below content to the file.
[main]
.....
[server]
server = pmaster.example.com
ca_server = pmaster.example.com
vardir = /opt/puppetlabs/server/data/puppetserver
logdir = /var/log/puppetlabs/puppetserver
rundir = /var/run/puppetlabs/puppetserver
pidfile = /var/run/puppetlabs/puppetserver/puppetserver.pid
codedir = /etc/puppetlabs/code
dns_alt_names = puppet
Once added, restart the server.
sudo systemctl restart puppetserverStep 5. Install Puppet Agent 8
We will install the Puppet Agent on our Debian 12 after adding the aforementioned repositories in step 2.
sudo apt update
sudo apt install puppet-agent
Now set the Puppet agent’s hostname for your Puppet Server.
sudo vim /etc/puppetlabs/puppet/puppet.confAdd the below line to the file.
[main]
server = pmaster.example.com
Next, restart and enable the service.
sudo systemctl restart puppet
sudo systemctl enable puppet
Step 6. Connect Puppet Agent to Puppet Server
Use the following command to generate certificates from your puppet agent(s) for the puppet master to sign:
sudo /opt/puppetlabs/bin/puppet agent -tResults:
Info: csr_attributes file loading from /etc/puppetlabs/puppet/csr_attributes.yaml
Info: Creating a new SSL certificate request for pagent.example.com
Info: Certificate Request fingerprint (SHA256): EA:1B:39:42:0C:D0:6A:B0:9E:56:E7:24:07:44:0F:50:4A:3D:6C:87:C1:51:7E:A2:8C:B6:AB:0B:C4:8F:AC:46
Info: Certificate for pagent.example.com has not been signed yet
Couldn't fetch certificate from CA server; you might still need to sign this agent's certificate (pagent.example.com).
Exiting now because the waitforcert setting is set to 0.
This command returns a certificate error because no certificates were found. This is due to the fact that the certificates that have been created must be signed/approved by the master.
Now, run the below command to list Puppet agent nodes on the Puppet Server.
sudo /opt/puppetlabs/bin/puppetserver ca listOutput:
Requested Certificates:
    pagent.example.com       (SHA256)  EA:1B:39:42:0C:D0:6A:B0:9E:56:E7:24:07:44:0F:50:4A:3D:6C:87:C1:51:7E:A2:8C:B6:AB:0B:C4:8F:AC:46
Following that, add the hostname of the Puppet Agent(s) to the Puppet server.
$ sudo /opt/puppetlabs/bin/puppetserver ca sign --certname pagent.example.com
Successfully signed certificate request for pagent.example.com
Return to the Puppet Agent at this point and give the command to sign the certificates once more.
$ sudo /opt/puppetlabs/bin/puppet agent -t
Info: Using environment 'production'
Info: Retrieving pluginfacts
Info: Retrieving plugin
Info: Caching catalog for pagent.example.com
Info: Applying configuration version '1699277272'
Notice: Applied catalog in 0.01 seconds
Step 7. Test your Puppet 8 Server-Agent
We must now verify whether communication has been established between our Puppet Agent and the master after connecting it successfully. To install the Apache web server, create the file as shown below on the Puppet server.
sudo vim /etc/puppetlabs/code/environments/production/manifests/init.ppAdd below contents.
class apache2 {
  package { 'apache2':
    ensure => installed,
  }

  service { 'apache2':
    ensure  => true,
    enable  => true,
    require => Package['apache2'],
  }
}
Now, make the site.pp file as shown below.
sudo vim /etc/puppetlabs/code/environments/production/manifests/site.ppAdd the below lines and change puppet.agent.node with your agent node name.
node 'puppet.agent-node' {
   include apache2
}

node 'puppet.agent-node' {
    include lamp
}
Next, run the following command on the Puppet Agent to install the Apache Web server.
sudo /opt/puppetlabs/bin/puppet agent -tOutput:

Finale
You have installed and configured Puppet Master and Puppet Agent on Debian 12 system. Explore the entire Puppet Puppet Documentation to learn everything you need to know about managing Puppet Server and all of your infrastructure automation.
Check out more articles:


