k3s is a portable, licensed Kubernetes deployment built for resource-constrained surroundings, edge information technology, and contexts where a smaller footprint is desired. While k3s offers a majority of the core functionalities of Kubernetes, it is specifically optimized for ease of use, ease of implementation, and efficient utilization of resources.
Cool Features of k3s
- Lightweight: K3s is better suited for edge devices, the Internet of Things, and other resource-constrained environments because it has a smaller memory footprint and uses fewer system resources than a standard Kubernetes cluster.
- Individualized Binary: Installation and upgrades are simple because k3s is packaged as a single binary with few dependencies.
- SQLite Database: Since SQLite is the default storage backend for k3s, no external databases or other storage backends are required. Deployment and oversight are made easier by this.
- Packaged Services: k3s packages critical services such as the package runtime (container), the service mesh (Flannel or Calico), and the DNS service, minimizing external requirements.
- Simple Installation: The procedure for setting up has been reduced and may be accomplished with just a single script, lowering the barrier to entry.
- TLS automatically: k3s simplifies the installation of TLS certificates, making safe communication inside the cluster easier.
- HA with Limited Resources: Even on systems with low resources, k3s provides excellent availability configurations.
- Isolation of the process: Processor isolation is used by k3s for distinguishing critical components, improving stability as well as security.
Use Cases of k3s
- Utilizing the Edge: k3s is suitable for installing Kubernetes clusters at the border of the network, closer to the sources of data, in order to handle containerized workloads effectively.
- Deployments of IoT: K3s can help organize and manage applications on devices that have limited resources in Internet of Things (IoT) environments.
- Planning and Testing k3s allows developers to create mini Kubernetes clusters that can be used for evaluating programs and prototypes, incurring the overhead of a complete cluster.
- Small-Scale apps: K3s provides a simple and lightweight solution to manage tiny apps or projects.
- Training Kubernetes: Because of its simple setup, k3s is an excellent tool for learning and playing with Kubernetes principles.
- Quick Prototyping: It is effective for fast prototyping and navigating containerized apps.
- Environments with Limited Resources: In circumstances where platform resources are constrained, such as embedded systems or low-power devices, k3s can provide Kubernetes features.
Benefits of k3s:
- Offer load balancing
- Reduce complexity of host-based container management
- Lower use of resources
- Configuration sped up
- Lightweight
- Highly Available
- Automation
In this guide, we will demonstrate how to Install Kubernetes Cluster using k3s on Debian 12 (Bookworm). Follow this guide keenly.
Install Kubernetes Cluster
Update system packages:
sudo apt update -yFor the demos in this guide, I will utilize 3 Servers running on Debian, two worker nodes and one control plane node, all of which are defined in the /etc/hosts file in each server. Define your servers as shown below:
$ sudo vim /etc/hosts
192.168.200.173 k3s-master
192.168.200.127 k3s-worker01
192.168.201.141 k3s-worker02
1. Install K3s on Master node
K3s can be operated in numerous ways. Installing with the given bash script is the quickest method. Installing to systemd or openrc is made simple by this script.
$ curl -sfL https://get.k3s.io | sh -
[INFO]  Finding release for channel stable
[INFO]  Using v1.27.4+k3s1 as release
[INFO]  Downloading hash https://github.com/k3s-io/k3s/releases/download/v1.27.4+k3s1/sha256sum-amd64.txt
[INFO]  Downloading binary https://github.com/k3s-io/k3s/releases/download/v1.27.4+k3s1/k3s
[INFO]  Verifying binary download
[INFO]  Installing k3s to /usr/local/bin/k3s
[INFO]  Skipping installation of SELinux RPM
[INFO]  Creating /usr/local/bin/kubectl symlink to k3s
[INFO]  Creating /usr/local/bin/crictl symlink to k3s
[INFO]  Creating /usr/local/bin/ctr symlink to k3s
[INFO]  Creating killall script /usr/local/bin/k3s-killall.sh
[INFO]  Creating uninstall script /usr/local/bin/k3s-uninstall.sh
[INFO]  env: Creating environment file /etc/systemd/system/k3s.service.env
[INFO]  systemd: Creating service file /etc/systemd/system/k3s.service
[INFO]  systemd: Enabling k3s unit
Created symlink /etc/systemd/system/multi-user.target.wants/k3s.service → /etc/systemd/system/k3s.service.
[INFO]  systemd: Starting k3s
The script we just executed above installs the following utilities:
- kubectl
- crictl
- k3s-killall.sh
- k3s-uninstall.sh
After installation, the service is automatically started, but to be sure, just confirm:
$ systemctl status k3s
● k3s.service - Lightweight Kubernetes
     Loaded: loaded (/etc/systemd/system/k3s.service; enabled; preset: enabled)
     Active: active (running) since Fri 2023-08-11 15:49:40 EAT; 13s ago
       Docs: https://k3s.io
    Process: 3534 ExecStartPre=/bin/sh -xc ! /usr/bin/systemctl is-enabled --quiet n>
    Process: 3536 ExecStartPre=/sbin/modprobe br_netfilter (code=exited, status=0/SU>
    Process: 3539 ExecStartPre=/sbin/modprobe overlay (code=exited, status=0/SUCCESS)
   Main PID: 3540 (k3s-server)
      Tasks: 21
     Memory: 549.1M
        CPU: 11.847s
     CGroup: /system.slice/k3s.service
             ├─3540 "/usr/local/bin/k3s server"
             └─3598 "containerd "

Aug 11 15:49:54 debian k3s[3540]: I0811 15:49:54.158385    3540 shared_informer.go:3>
Aug 11 15:49:54 debian k3s[3540]: I0811 15:49:54.158749    3540 shared_informer.go:3>
In /etc/rancher/k3s/k3s.yaml, a kubeconfig file is created, which defines the configurations for Kubernetes:
$ sudo cat /etc/rancher/k3s/k3s.yaml
...........
  server: https://127.0.0.1:6443
  name: default
contexts:
- context:
    cluster: default
    user: default
  name: default
current-context: default
kind: Config
preferences: {}
users:
- name: default
  user:
............
2. Install K3s on Worker Nodes
We must pass the environment variables K3S_URL, K3S_TOKEN, or K3S_CLUSTER_SECRET when installing on worker nodes. The token is obtained from the first node we created, which is the control plane node. Run the following command to access the token:
$ sudo cat /var/lib/rancher/k3s/server/node-token
K10d1c66aff221f5f9c5f77e517959ebcb2f3f53dd5f9c3104c1743514d09b1c2a0::server:168a3840f145dae9ee8018fd841a462b
In order to install Kubernetes on worker nodes, we will execute the command:
k3s_url="https://k3s-master:6443"
k3s_token="K10d1c66aff221f5f9c5f77e517959ebcb2f3f53dd5f9c3104c1743514d09b1c2a0::server:168a3840f145dae9ee8018fd841a462b"
curl -sfL https://get.k3s.io | K3S_URL=${k3s_url} K3S_TOKEN=${k3s_token} sh -
Sample output:
[INFO]  Finding release for channel stable
[INFO]  Using v1.27.4+k3s1 as release
[INFO]  Downloading hash https://github.com/k3s-io/k3s/releases/download/v1.27.4+k3s1/sha256sum-amd64.txt
[INFO]  Skipping binary downloaded, installed k3s matches hash
[INFO]  Skipping installation of SELinux RPM
[INFO]  Skipping /usr/local/bin/kubectl symlink to k3s, already exists
[INFO]  Skipping /usr/local/bin/crictl symlink to k3s, already exists
[INFO]  Skipping /usr/local/bin/ctr symlink to k3s, already exists
[INFO]  Creating killall script /usr/local/bin/k3s-killall.sh
[INFO]  Creating uninstall script /usr/local/bin/k3s-agent-uninstall.sh
[INFO]  env: Creating environment file /etc/systemd/system/k3s-agent.service.env
[INFO]  systemd: Creating service file /etc/systemd/system/k3s-agent.service
[INFO]  systemd: Enabling k3s-agent unit
Created symlink /etc/systemd/system/multi-user.target.wants/k3s-agent.service → /etc/systemd/system/k3s-agent.service.
[INFO]  systemd: Starting k3s-agent
Check the cluster status by logging in to the control plane node and running the commands:
$ sudo kubectl config get-clusters
NAME
default

$ sudo kubectl cluster-info
Kubernetes control plane is running at https://127.0.0.1:6443
CoreDNS is running at https://127.0.0.1:6443/api/v1/namespaces/kube-system/services/kube-dns:dns/proxy
Metrics-server is running at https://127.0.0.1:6443/api/v1/namespaces/kube-system/services/https:metrics-server:https/proxy

$ sudo kubectl get  nodes
NAME       STATUS   ROLES                  AGE     VERSION
master     Ready    control-plane,master   9m52s   v1.27.4+k3s1
worker01   Ready    <none>                 2m31s   v1.27.4+k3s1
worker02   Ready    <none>                 60s     v1.27.4+k3s1

$ sudo kubectl get namespaces
NAME              STATUS   AGE
default           Active   4m6s
kube-system       Active   4m6s
kube-public       Active   4m6s
kube-node-lease   Active   4m6s

$ sudo  kubectl get endpoints -n kube-system
NAME             ENDPOINTS                                  AGE
kube-dns         10.42.0.5:53,10.42.0.5:53,10.42.0.5:9153   4m8s
traefik          10.42.0.8:8000,10.42.0.8:8443              3m50s
metrics-server   10.42.0.2:10250                            4m8s

$ sudo kubectl get pods -n kube-system
NAME                                     READY   STATUS      RESTARTS   AGE
local-path-provisioner-957fdf8bc-8mp5n   1/1     Running     0          4m26s
coredns-77ccd57875-lsjth                 1/1     Running     0          4m26s
helm-install-traefik-crd-2687q           0/1     Completed   0          4m26s
svclb-traefik-d92cf7fb-g6rmx             2/2     Running     0          4m8s
helm-install-traefik-pgp5d               0/1     Completed   1          4m26s
traefik-64f55bb67d-5rz8v                 1/1     Running     0          4m8s
metrics-server-648b5df564-6l8gb          1/1     Running     0          4m26s

## To see running containers from the worker node ###
$ sudo crictl p
CONTAINER           IMAGE               CREATED             STATE               NAME                     ATTEMPT             POD ID              POD
4084862825c3a       d1e26b5f8193d       4 minutes ago       Running             traefik                  0                   e25abad7103c1       traefik-64f55bb67d-5rz8v
128535dc4e4c1       af74bd845c4a8       4 minutes ago       Running             lb-tcp-443               0                   f848a28e44e33       svclb-traefik-d92cf7fb-g6rmx
df2765c4fb9e2       af74bd845c4a8       4 minutes ago       Running             lb-tcp-80                0                   f848a28e44e33       svclb-traefik-d92cf7fb-g6rmx
71488fff04268       817bbe3f2e517       4 minutes ago       Running             metrics-server           0                   ff50a4418ce73       metrics-server-648b5df564-6l8gb
3. Deploy Application on k3s Kubernetes
We’ll check the success of our cluster deployment by deploying Nginx pods in our cluster.
k3s kubectl apply -f - <<EOF
apiVersion: apps/v1
kind: Deployment
metadata:
  name: nginx-deployment
spec:
  selector:
    matchLabels:
      app: nginx
  replicas: 4
  template:
    metadata:
      labels:
        app: nginx
    spec:
      containers:
      - name: nginx
        image: nginx:latest
        ports:
        - containerPort: 80
EOF
Output:
deployment.apps/nginx-deployment createdVerify pod status.
$ k3s kubectl get pods
NAME                                READY   STATUS    RESTARTS   AGE
nginx-deployment-57d84f57dc-p72kq   1/1     Running   0          31s
nginx-deployment-57d84f57dc-4rhz6   1/1     Running   0          31s
nginx-deployment-57d84f57dc-44zsv   1/1     Running   0          31s
nginx-deployment-57d84f57dc-8qtcv   1/1     Running   0          31s
Identify the port on which the pods are right now operating.
$ k3s kubectl expose deployment nginx-deployment --type=NodePort --port=80
service/nginx-deployment exposed
Examine the ports that the exposed services used to communicate through.
$ k3s kubectl get svc
NAME               TYPE        CLUSTER-IP    EXTERNAL-IP   PORT(S)        AGE
kubernetes         ClusterIP   10.43.0.1     <none>        443/TCP        17m
nginx-deployment   NodePort    10.43.57.76   <none>        80:32526/TCP   17s
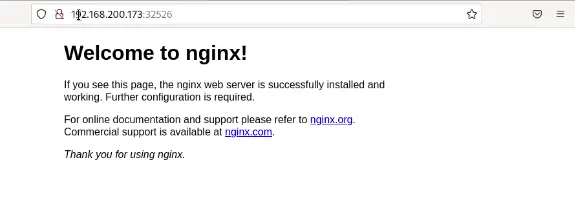
The output shows that NodePort on the port 32526 has exposed our Nginx service. On the worker node, we may use the port to access the application using the browser.
As mentioned before, my worker node’s IP address is 192.168.200.173. When using the browser, enter http://192.168.200.173:32526.

4. Adding addons
When launching k3s on the master node, you can use the –enable addon option to activate a system default addon. The name of the addon you want to enable should be substituted for addon. For instance, you might run: to enable the traefik ingress controller addon.
sudo k3s server enable traefikWith the provided addon activated, this command starts K3S.
Verify Addon Installation:
The resources of the addon will be deployed to the cluster once the k3s server has started with the addon enabled. To confirm that the addon components are active, use kubectl:
sudo kubectl get pods --all-namespacesYou should see the pods associated with the activated addon when using this command to display all of the namespaces’ pods to you.
Use the Addon:
You can start using the addon as intended after its components are installed and running. You might establish Ingress resources to direct traffic to your services, for instance, if you enabled the traefik ingress controller.
Additional Addons:
You can enable a variety of system default addons with k3s. The addons traefik (ingress controller), metrics-server (for resource utilization monitoring), and local-storage (for local storage providing) are a few examples of those that are readily available. By listing numerous addons separated by commas, you can enable them all at once:
sudo k3s server enable traefik,metrics-server,local-storage5. How to remove node
To remove the node from the cluster, use the following command on the k3s master node:
kubectl delete node <NODE_NAME>If you want to remove a node, replace NODE_NAME with its name.
For instance, to remove worker01:
$ sudo kubectl delete node worker01
node "worker01" deleted
Verification:
Run the following command on the master node to make sure the node has been correctly removed:
$ sudo kubectl get nodes
NAME       STATUS   ROLES                  AGE   VERSION
worker02   Ready    <none>                 69m   v1.27.4+k3s1
master     Ready    control-plane,master   78m   v1.27.4+k3s1
The removed node should no longer be listed.
6. Destroying cluster
The k3s installation program also includes the installation of kubectl, crictl, k3s-killall.sh, and k3s-uninstall.sh in addition to the installation of k3. To eliminate K3s, execute the following command:
sudo /usr/local/bin/k3s-uninstall.shTo warp it up, k3s is a lightweight and efficient Kubernetes distribution that simplifies the deployment, management, and orchestration of containerized applications. k3s keeps most basic Kubernetes functionality while lowering complexity and overhead. It was designed with limited in resources situations, remote computing, and ease of deployment in mind.


