

Are you looking for an easy way to export a Virtual Machine running on Proxmox VE and running it on KVM hypervisor. Proxmox VE is an enterprise grade Virtualization solution that runs on Debian operating system. It gives SysAdmins a powerful dashboard from where most virtualization operations can be performed. In this article we’ll cover the process of migrating a Virtual Machine from Proxmox VE to KVM.
If you’re looking to migrate from KVM to Proxmox instead, check out the following guide:
🔥 Check out the #1 best-selling eBook on KVM Virtualization – your ultimate guide to mastering it!
I have a Proxmox VE 7 server with Virtual Machines as listed using qm command line tool below:
$ qm list
      VMID NAME                 STATUS     MEM(MB)    BOOTDISK(GB) PID
       100 Ubuntu22             running    2048              20.00 1092
       101 Controller           running    2048              32.00 1138
       102 FreeIPA-Server       running    8192              50.00 1210
The Virtual Machine that I would be migrating from Proxmox VE to vanilla KVM is the one with id 102. We can check more information about the virtual machine using config qm command option.
$ qm config 102
agent: 1
boot: order=scsi0;ide2;net0
cores: 4
cpu: host
ide2: none,media=cdrom
memory: 8192
meta: creation-qemu=6.2.0,ctime=1658942649
name: FreeIPA-Server
net0: virtio=AE:39:5A:16:10:FB,bridge=vmbr0,firewall=1
numa: 0
onboot: 1
ostype: l26
parent: FreeIPA_installed
protection: 1
scsi0: local-lvm:vm-102-disk-0,size=50G
scsihw: virtio-scsi-pci
smbios1: uuid=a4075e7d-4278-478f-8d79-50f369c9b9c2
sockets: 1
vmgenid: b08b23e6-c545-41d8-9423-fca2855a759d
Export Proxmox Virtual Machine as Qcow2 image
The current default setup of Proxmox VE uses LVM. When you do an installation of Proxmox on your server hardware and select a single disk for use, the same disk is set as physical volume for the Volume Group (VG) pve.
A physical volume and volume group used can be checked with the command:
 # pvs
  PV             VG  Fmt  Attr PSize    PFree
  /dev/nvme0n1p3 pve lvm2 a--  <476.44g <16.00g

#  vgs
  VG  #PV #LV #SN Attr   VSize    VFree
  pve   1  12   0 wz--n- <476.44g <16.00g
The installer allocates data Logical Volume (LV) inside pve VG. This volume uses LVM-thin, and is used to store VM images.
Let’s check the Logical Volume path of the Virtual Machine:
$ lvdisplay | grep 102
  LV Path                /dev/pve/vm-102-disk-0
  LV Name                vm-102-disk-0
  LV Path                /dev/pve/snap_vm-102-disk-0_FreeIPA_installed
  LV Name                snap_vm-102-disk-0_FreeIPA_installed
  LV Thin origin name    vm-102-disk-0
The LV path of the VM is /dev/pve/vm-102-disk-0. More information on this LV can be checked using lvdisplay.
$ lvdisplay /dev/pve/vm-102-disk-0
  --- Logical volume ---
  LV Path                /dev/pve/vm-102-disk-0
  LV Name                vm-102-disk-0
  VG Name                pve
  LV UUID                mgycxg-q4HO-KKdT-D3HH-qvF7-fs46-HhJVb2
  LV Write Access        read/write
  LV Creation host, time pve01, 2024-07-27 20:24:10 +0300
  LV Pool name           data
  LV Status              available
  # open                 1
  LV Size                50.00 GiB
  Mapped size            5.75%
  Current LE             12800
  Segments               1
  Allocation             inherit
  Read ahead sectors     auto
  - currently set to     256
  Block device           253:10
We can export the Virtual Machine by converting the logical volume to qcow2 image.
qemu-img convert -O qcow2 /dev/pve/vm-102-disk-0 ~/FreeIPA-Server.qcow2The command syntax is:
qemu-img convert -O qcow2 <INPUT-PATH> <OUTPUT>.qcow2The destination file is ~/FreeIPA-Server.qcow2.
$ file ~/FreeIPA-Server.qcow2
/root/FreeIPA-Server.qcow2: QEMU QCOW2 Image (v3), 53687091200 bytes

$ du -sh ~/FreeIPA-Server.qcow2
2.9G    /root/FreeIPA-Server.qcow2
Import Exported Proxmox VM on KVM
Copy the virtual machine qcow2 export to your KVM host.
scp ~/FreeIPA-Server.qcow2 [email protected]:~/Install cockpit and cockpit-machines plugin
Cockpit is a web-based Linux management tool with support for Virtual Machines administration. Install Cockpit and Virtual Machines management plugin.
### Ubuntu / Debian ###
sudo apt update
sudo apt install cockpit cockpit-machines
sudo systemctl enable cockpit && sudo systemctl restart cockpit

### CentOS / Fedora / RHEL / Rocky / AlmaLinux ###
sudo yum install cockpit -y
sudo systemctl enable --now cockpit.socket
sudo yum install cockpit cockpit-machines -y
sudo systemctl restart cockpit
Confirm service status:
$ systemctl status cockpit
● cockpit.service - Cockpit Web Service
   Loaded: loaded (/usr/lib/systemd/system/cockpit.service; static; vendor preset: disabled)
   Active: active (running) since Wed 2024-10-05 22:33:14 EAT; 34s ago
     Docs: man:cockpit-ws(8)
 Main PID: 18147 (cockpit-tls)
    Tasks: 1 (limit: 203549)
   Memory: 2.1M
   CGroup: /system.slice/cockpit.service
           └─18147 /usr/libexec/cockpit-tls

Oct 05 22:33:14 kvm01.home.cloudlabske.io systemd[1]: Starting Cockpit Web Service...
Oct 05 22:33:14 kvm01.home.cloudlabske.io cockpit-certificate-ensure[18139]: Generating a RSA private key
Oct 05 22:33:14 kvm01.home.cloudlabske.io cockpit-certificate-ensure[18139]: ...........+++++
Oct 05 22:33:14 kvm01.home.cloudlabske.io cockpit-certificate-ensure[18139]: ....................................................+++++
Oct 05 22:33:14 kvm01.home.cloudlabske.io cockpit-certificate-ensure[18139]: writing new private key to '0-self-signed.key'
Oct 05 22:33:14 kvm01.home.cloudlabske.io cockpit-certificate-ensure[18139]: -----
Oct 05 22:33:14 kvm01.home.cloudlabske.io systemd[1]: Started Cockpit Web Service.
Import VM exported from Proxmox VE on KVM
Login to KVM Node and check the image we copied.
$ qemu-img  info  ~/FreeIPA-Server.qcow2
image: /root/FreeIPA-Server.qcow2
file format: qcow2
virtual size: 50 GiB (53687091200 bytes)
disk size: 2.87 GiB
cluster_size: 65536
Format specific information:
    compat: 1.1
    compression type: zlib
    lazy refcounts: false
    refcount bits: 16
    corrupt: false
    extended l2: false
Let’s move this image to /var/lib/libvirt/images/ directory. This is the default storage pool on KVM.
sudo mv ~/FreeIPA-Server.qcow2 /var/lib/libvirt/images/Login to Cockpit dashboard at https://KVMIP:9090. Login as root user and its password.
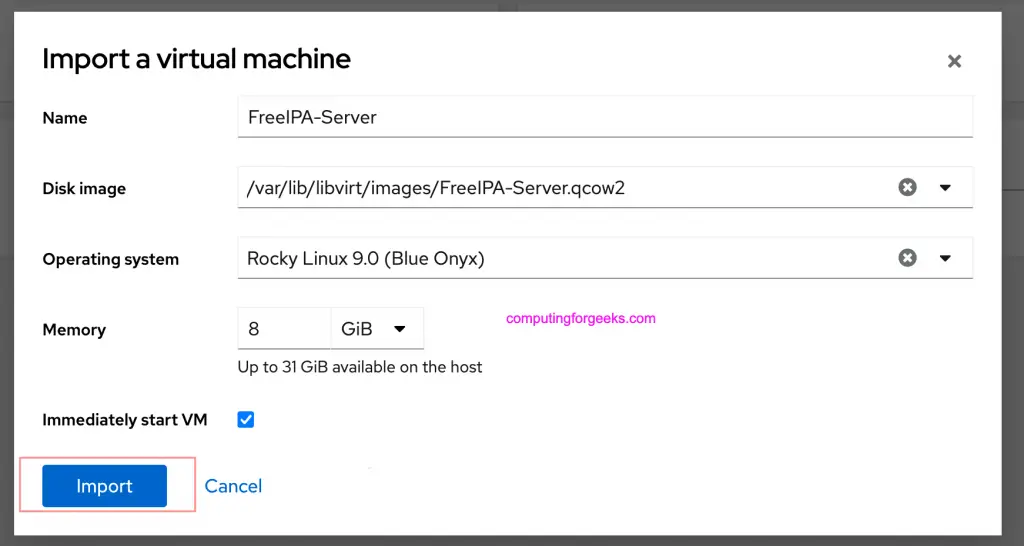
Under “Virtual Machine” click on “Import VM“

Give a name, Disk image path, choose operating system, memory and import the virtual machine from Proxmox to KVM.
Confirm the status of the Virtual Machine once import process is complete.
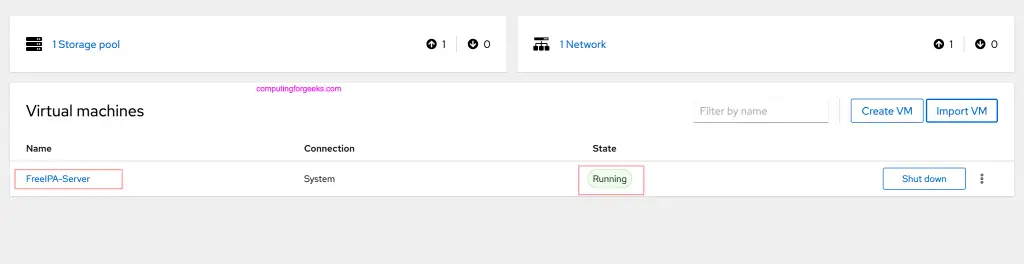
You can now access the VM once running using VNC console or SSH.

The status of the VM can also be checked using virsh
[root@kvm01 ~]# virsh list
 Id   Name             State
--------------------------------
 1    FreeIPA-Server   running
Get the IP address , or set manually and test accessibility using ping. Don’t forget to check network interface naming on the VM. If it changes reconfigure IP information in the instance accordingly.
$ ping 172.20.30.252
PING 172.20.30.252 (172.20.30.252): 56 data bytes
64 bytes from 172.20.30.252: icmp_seq=0 ttl=63 time=2.132 ms
64 bytes from 172.20.30.252: icmp_seq=1 ttl=63 time=2.370 ms
^C
--- 172.20.30.252 ping statistics ---
2 packets transmitted, 2 packets received, 0.0% packet loss
round-trip min/avg/max/stddev = 2.132/2.251/2.370/0.119 ms
In this article we’ve covered the process of exporting a Virtual Machine on Proxmox VE and importing it into KVM. In this guide we covered the importation process when using Cockpit.
Tags:
- Migrate from proxmox to KVM
- Proxmox VM to KVM
- Export proxmox VM to KVM VM


