Containerization has come handy in deploying micro-services and many opensource applications provide images that can easily be used to run containers. All one has to do is to install a container run rime and pull publicly available images from a public registry for the applications they wish to run. It is also easy to built own images and share by uploading to a public repository. Docker has been the mostly used container runtime but recently Podman was released to help in creating and maintaining containers.
What is Podman and Nextcloud?
Podman (short for Pod Manager) is a new daemonless container engine that works seamlessly with both containers and pods. It is provided as part of the libpod library and is used to develop, run and manage OCI (Open Container Initiative) containers. Since it does not depend on any daemon, Podman runs containers and pods as child processes.
Nextcloud is a fileshare and collaboration tool coming after Owncloud. It enables real time synchronization and sharing of files across an organization. It is fully opensource. It can be installed normally through an installation package but can also be run as a container. Nextcloud already provides a documentation for the installation of Nextcloud using both Docker and Podman.
Install Podman on Linux Systems
It is pretty simple to install Podman on any Linux. Follow the guides in below links:
Run Nextcloud Storage Solution on Podman
Nextcloud consists of various services which should be put in mind during its deployment. These include: A database (recommended Mariadb), a webserver (nginx or Apache) and Nextcloud application itself. Nextcloud already offers a good documentation for container deployments. In this article, we will be looking at installing Nextcloud Apache httpd.
Persistent Volumes
When working with containers, persistent volumes are used to ensure that container data is available even if the container is stopped. When no volumes are used, the data will not persist when the container does not exist. It is also hard to get the data when a container is already using it and thus persistent volumes are required. When you create a volume to store container data, it is stored on the host server and you can mount it into the container. It is possible to mount the same volume to different containers to utilize the same data.
For this Deployment, we are going to need volumes to hold Nextcloud data. This will enable the data to persist even when the container is redeployed or is stopped. In this case, we are going to create three volumes for Nextcloud DB, Nextcloud data and nextcloud app files. Once Podman is installed in your Fedora Linux, create the volumes as below:
podman volume create nextcloud-app
podman volume create nextcloud-data
podman volume create nextcloud-db
You can list the volumes to confirm as below
$ podman volume ls
DRIVER      VOLUME NAME
local       nextcloud-app
local       nextcloud-data
local       nextcloud-db
To check the details of the volumes, use ‘inspect’ as per the below example
$ podman volume inspect nextcloud-app
[
    {
        "Name": "nextcloud-app",
        "Driver": "local",
        "Mountpoint": "/home/lorna/.local/share/containers/storage/volumes/nextcloud-app/_data",
        "CreatedAt": "2024-06-25T14:58:06.687976764+03:00",
        "Labels": {},
        "Scope": "local",
        "Options": {}
    }
]
Creating Container Networks
You can choose to create a dedicated network for your containers instead of using the default network. Once you create a network, you deploy containers to the network. The created network provides dnsname plugin which makes it easy for the containers deployed in the network to communicate using DNS names. To create an isolated network for our Nextcloud deployment, run the command below:
podman network create nextcloud-netGet the details of the created network using inspect
$ podman network inspect nextcloud-net
[
    {
        "cniVersion": "0.4.0",
        "name": "nextcloud-net",
        "plugins": [
            {
                "bridge": "cni-podman1",
                "hairpinMode": true,
                "ipMasq": true,
                "ipam": {
                    "ranges": [
                        [
                            {
                                "gateway": "10.89.0.1",
                                "subnet": "10.89.0.0/24"
                            }
                        ]
                    ],
                    "routes": [
                        {
                            "dst": "0.0.0.0/0"
                        }
                    ],
                    "type": "host-local"
                },
                "isGateway": true,
                "type": "bridge"
            },
            {
                "capabilities": {
                    "portMappings": true
                },
                "type": "portmap"
            },
            {
                "backend": "",
                "type": "firewall"
            },
            {
                "type": "tuning"
            },
            {
                "capabilities": {
                    "aliases": true
                },
                "domainName": "dns.podman",
                "type": "dnsname"
            }
        ]
    }
]
You can see that the DNS name is dns.podman. The containers will have names as container_name.dns.podman
Deploying MariaDB Database
At this point, we are done with setting up the environment. We are going to start deploying Nextcloud services. Let’s start with MariaDB. Ensure to provide the passwords accordingly
$ podman run --detach --env MYSQL_DATABASE=nextcloud \
  --env MYSQL_USER=nextcloud \
  --env MYSQL_PASSWORD=password \
  --env MYSQL_ROOT_PASSWORD=password \
  --volume nextcloud-db:/var/lib/mysql \
  --network nextcloud-net --restart on-failure \
  --name nextcloud-db docker.io/library/mariadb

Trying to pull docker.io/library/mariadb:latest...
Getting image source signatures
Copying blob 329b1f41043f done
Copying blob c549ccf8d472 done
Copying blob 2bc055a5511d done
Copying blob e989e430508e done
Copying blob 26ea6552a462 done
Copying blob 9f8d09317d80 done
Copying blob cdba2af19f87 done
Copying blob 04fe4f90eab8 done
Copying blob 389c6b423e31 done
Copying blob bef640655d86 done
Copying config 6d5c5ed114 done
Writing manifest to image destination
Storing signatures
53b4c1866bb06dc256107857bff1dc1a711d8225dda9a4d8ad99daebcc1ad182
Confirm the deployed MariaDB container
$ podman container ls
CONTAINER ID  IMAGE                               COMMAND               CREATED             STATUS                 PORTS                 NAMES
db9fb85a81cc  docker.io/library/mariadb:latest    mariadbd              About a minute ago  Up About a minute ago                        nextcloud-db
Next, we deploy nextcloud application. Remember that we are using Nextcloud Apache httpd which is already packaged. If we had used Nextcloud php-fpm, we would be required to deploy Nginx container. Run the podman command below to deploy Nextcloud and remember to provide your desired passwords and Nextcloud user.
podman run --detach --env MYSQL_HOST=nextcloud-db.dns.podman \
  --env MYSQL_DATABASE=nextcloud \
  --env MYSQL_USER=nextcloud \
  --env MYSQL_PASSWORD=password \
  --env NEXTCLOUD_ADMIN_USER=admin \
  --env NEXTCLOUD_ADMIN_PASSWORD=password \
  --volume nextcloud-app:/var/www/html \
  --volume nextcloud-data:/var/www/html/data \
  --network nextcloud-net \
  --restart on-failure \
  --publish 8080:80 \
  --name nextcloud docker.io/library/nextcloud:latest
Output:
Trying to pull docker.io/library/nextcloud:latest...
Getting image source signatures
Copying blob b4d181a07f80 skipped: already exists
Copying blob 614ec6f0b8d6 done
Copying blob 96bcb7d2e6b0 done
Copying blob 78b85dd8f014 done
Copying blob 12b28f3797fb done
Copying blob 8589b26a90be done
Copying blob f5af5d641946 done
Copying blob 54591be7a3e1 done
Copying blob fdb99f417e70 done
Copying blob e482b4aefb55 done
Copying blob d331703849ca done
Copying blob bc5a699772c0 done
Copying blob f9a69349a09a done
Copying blob ba15f1adebad done
Copying blob 7355e68e6902 done
Copying blob a979aeceff7d done
Copying blob 6abc660775de done
Copying blob ec5fc0d2a0e6 done
Copying blob d93c4c6b8e11 done
Copying blob 32bcbd6b22d1 done
Copying config 283663c252 done
Writing manifest to image destination
Storing signatures
570bf9c5e6a7d6f6a6580f8d2c1fcfdfe728265a7b5cfc1181f3bcdbf4db4d92
Again, confirm the deployed container
$ podman container ls
CONTAINER ID  IMAGE                               COMMAND               CREATED             STATUS                 PORTS                 NAMES
db9fb85a81cc  docker.io/library/mariadb:latest    mariadbd              About a minute ago  Up About a minute ago                        nextcloud-db
44afb29a8800  docker.io/library/nextcloud:latest  apache2-foregroun...  43 seconds ago      Up 44 seconds ago      0.0.0.0:8080->80/tcp  nextcloud
Accessing Nextcloud from the Browser
The two containers are now up. The service should bind to port 8080 as can be checked below:
$ sudo ss -tunelp | grep :80
tcp    LISTEN  0       4096                                       0.0.0.0:8080                                       0.0.0.0:*                                   users:(("conmon",pid=19189,fd=5)) ino:58069 sk:4 <->
Point your IP address on the browser on port 8080 to access Nextcloud and continue with the configuration.
http://[server_ip_or_hostname]:8080You should get the login page below:

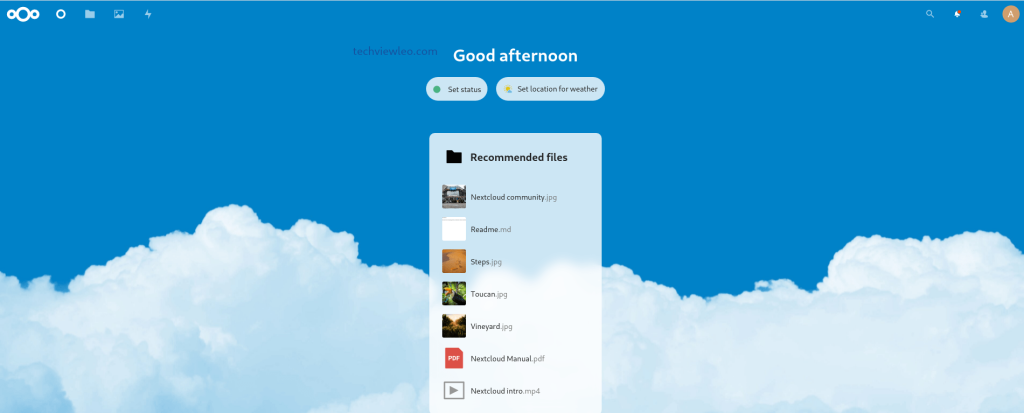
Enter the username and password that you set above for Nextcloud UI access. Once you login, you are ready to use your Nextcloud for sharing files.

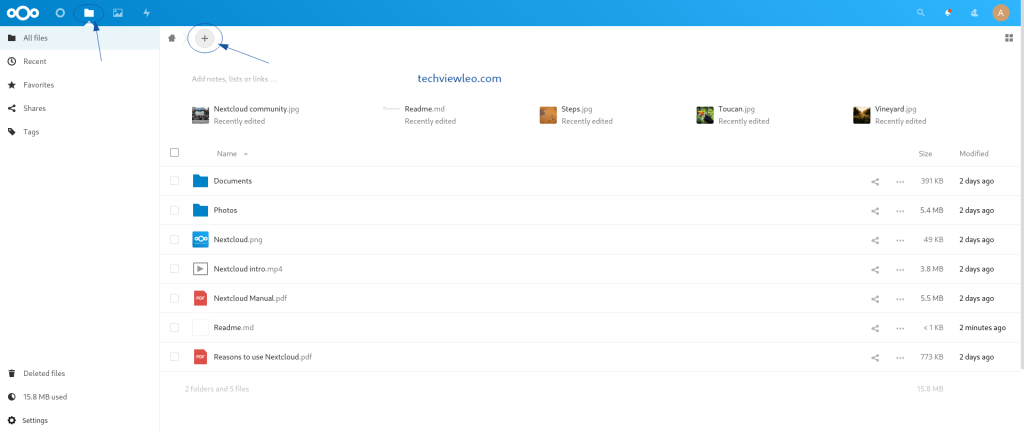
If you click on the files icon, you should see the existing default files. The + icon allows you to upload your files.

Updating Nextcloud Running in Docker Containers
To update nextcloud, you will need to deploy the containers again by pulling the new container images and running them again. Stop the existing containers, remove them and deploy the new containers as below:
# Update mariadb
$ podman pull mariadb:latest
$ podman stop nextcloud-db
$ podman rm nextcloud-db

$ podman run --detach --env MYSQL_DATABASE=nextcloud \
  --env MYSQL_USER=nextcloud \
  --env MYSQL_PASSWORD=DB_USER_PASSWORD \
  --env MYSQL_ROOT_PASSWORD=DB_ROOT_PASSWORD \
  --volume nextcloud-db:/var/lib/mysql \
  --network nextcloud-net \
  --restart on-failure \
  --name nextcloud-db docker.io/library/mariadb:latest


# Update Nextcloud
$ podman pull nextcloud:latest
$ podman stop nextcloud
$ podman rm nextcloud

podman run --detach --env MYSQL_HOST=nextcloud-db.dns.podman \
  --env MYSQL_DATABASE=nextcloud \
  --env MYSQL_USER=nextcloud \
  --env MYSQL_PASSWORD=DB_USER_PASSWORD \
  --env NEXTCLOUD_ADMIN_USER=NC_ADMIN \
  --env NEXTCLOUD_ADMIN_PASSWORD=NC_PASSWORD \
  --volume nextcloud-app:/var/www/html \
  --volume nextcloud-data:/var/www/html/data \
  --network nextcloud-net --restart on-failure \
  --name nextcloud --publish 8080:80 docker.io/library/nextcloud:latest
Conclusion
Use of containers has made running of most opensource applications easy and fast. This is because there are already bundled packages (container images) that can easy be pulled and are available to the public. Installation a container runtime such as Podman is also quite easy. In this guide, we have seen how to use Podman to run Nextcloud application on Fedora Linux.
The guide applies to any other Linux distro, the only thing that will differ is the installation of Podman where you run the command using a package manager suitable for the Linux distribution you are installing on. I hope the guide has been useful.


