
What is Burp Suite?
Burp Suite is a software security tool used for web application penetration and testing. It provides a set of tools, specifically designed for testing of web applications and their vulnerabilities. Web applications is just a fancy term used to refer to modern day websites which have much more functionality than traditional websites. Burp Suite has three versions: a free community edition, a professional edition, and an enterprise edition. The professional and enterprise edition both cost some bucks per year, but if you are in the web security business, I would say that they are worth their money.
Here are some of the tools offered by Burp Suite:
- Intruder: Burp Intruder runs multiple inputs across a platform and into the server. The output is evaluated for success/failure as per the server response. The intruder is mostly used to launch brute force attacks when trying to crack a web applications security.
- Repeater: As suggested by the name, this a more of a tool that repeatedly sends HTTP request to web applications. With it, you can test for vulnerabilities in the security structure.
- Decoder: The decoder offers supports for a couple data encoding and encoding schemes which might be of great help when it comes to dealing with encoded data. This tool is useful for decoding and encoding data when working with web applications.
- Comparer: If you’d like to compare HTTP request and take a crack at their structure while playing around with them a bit, then you are in luck, the Burp Comparer allows you to do exactly that.
- Burp Scanner: This is Burp tool is only available in Burp Professional and Enterprise version. It is a tool used to scan for threats and vulnerabilities in a any web application.
Using Burp Suite on Kali Linux
In Kali Linux, Burp Suite is pretty much pre-installed with the operating system itself. All you can do is update to the latest version of Burp Suite, which is so as to avoid conflicts with JRE and the Burp platform.
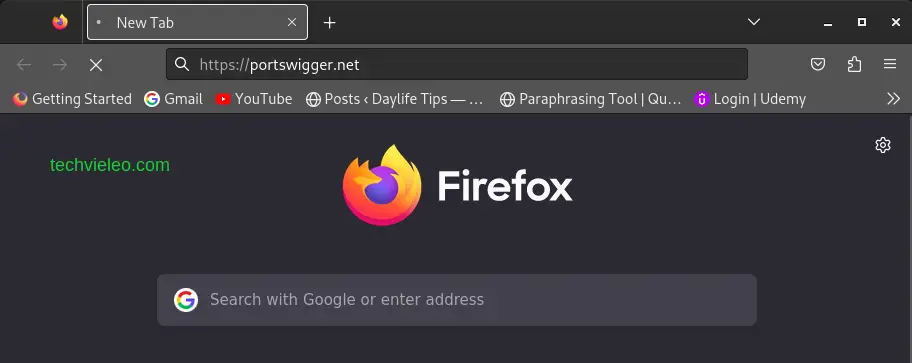
Step 1: Configure your browser(FireFox)
Now, before we can use Burp Suite, we have to tell the browser to use route all the traffic through Burp’s proxy. The Proxy IP is provided under Proxy>Options. The IP address(127.0.0.1) is very familiar, as you might recognize it as the loopback Interface. As long as at least one IP interface on the switch is active, this loopback Interface always up and reachable. The loopback interface can be used for routing protocols, debugging duties, and in some cases as a termination address.
You can configure your browser by going to the options menu and editing the proxy settings. On the other hand, you can choose to install a very handy tool called FoxyProxy and avoid having to edit the proxy settings every time you want to analyze you web applications.
To install FoxyProxy, open Firefox and navigate to Option>Add-Ons and search for FoxyProxy then click on Add.

After you’ve successfully added FoxyProxy , navigate to it and edit it’s proxy settings by adding one. Click on the Add button to add a proxy setting and then go ahead to fill in the blanks for your proxy settings and hit save.

Step 2: Install Burp’s CA certificate in FireFox
Ensure that the proxy listener is operational and that your browser is set up to cooperate with Burp before attempting to install Burp’s CA certificate. Now that we’ve completed that, we can move on to installing the CA certificate.
Keep in mind that you only need to do this if you want to utilize your own external browser for Burp manual testing. If you’d prefer, you may just use Burp’s built-in browser, which is already set up to function with Burp Proxy. Go to the Proxy > Intercept tab and click Open Browser to view Burp’s browser.
Follow these steps to install Burp’s CA certificate in Firefox:
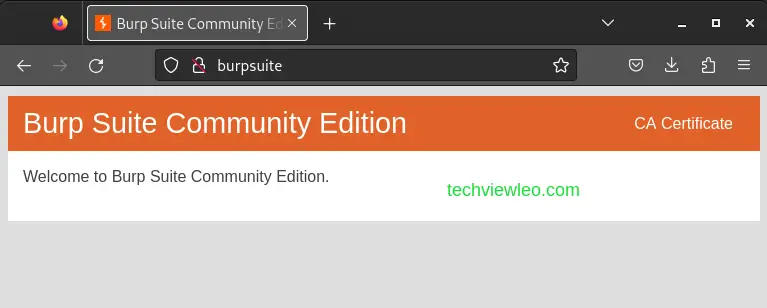
Visit http://burpsuite with Firefox when Burp is active. The page that states “Welcome to Burp Suite Professional” should be loaded by Firefox when you hit enter.
In the top-right corner of the page, click CA Certificate to download your unique Burp CA certificate. Ensure you take note of where you save this.
In Firefox, open the menu and click Settings>Privacy&Security. From that sections, scroll down to the Certificates section and click the View certificates button. In the dialog that opens, go the Authorities tab and click Import. Select the Burp CA certificate that you downloaded earlier and click Open.
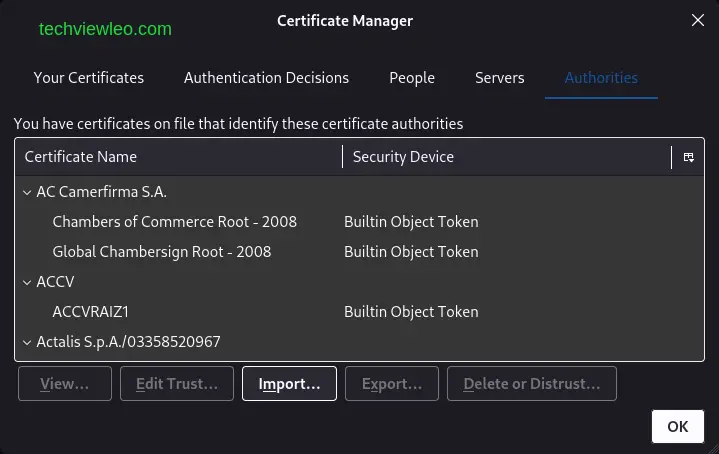
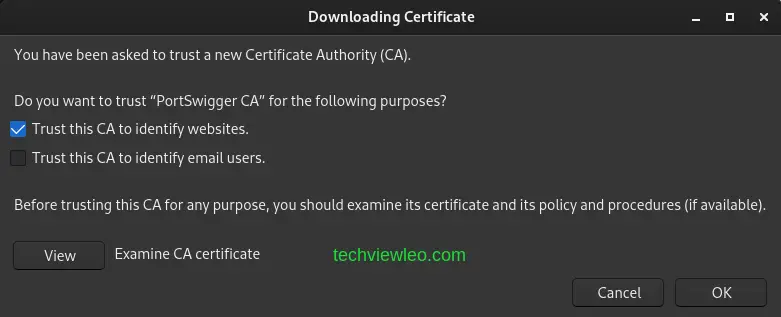
When prompted to edit the trust settings, make sure the checkbox This certificate can identify websites is selected and click OK.
Restart Firefox after closing it. Try browsing to any HTTPS URL while Burp is still active. If everything went according to plan, you should now be able to access the page without receiving any security alerts.
Usage Examples
Let’s get into some of the basic penetration testing tasks we can do using Burp Suite. Before we do any of it,ensure that you have Burp Suite and Firefox running.

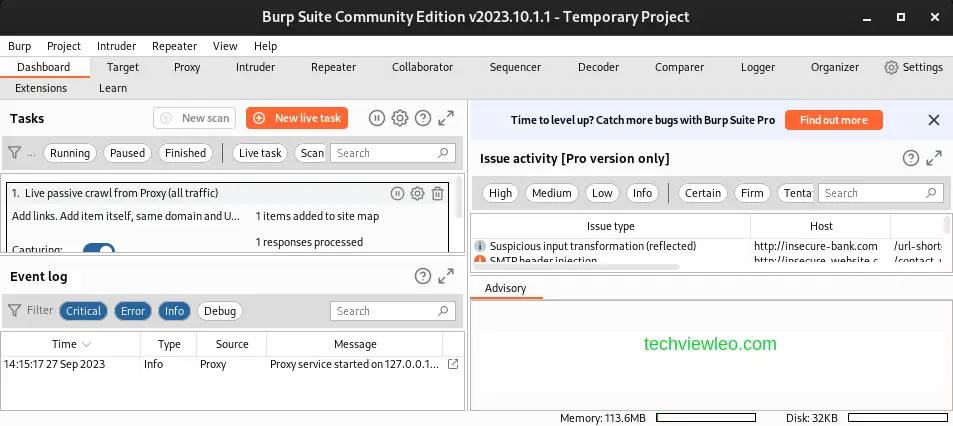
When Burp is up and running, click on Next and in the page click on Star Burp. Don’t change any of the selected options when starting Burp.
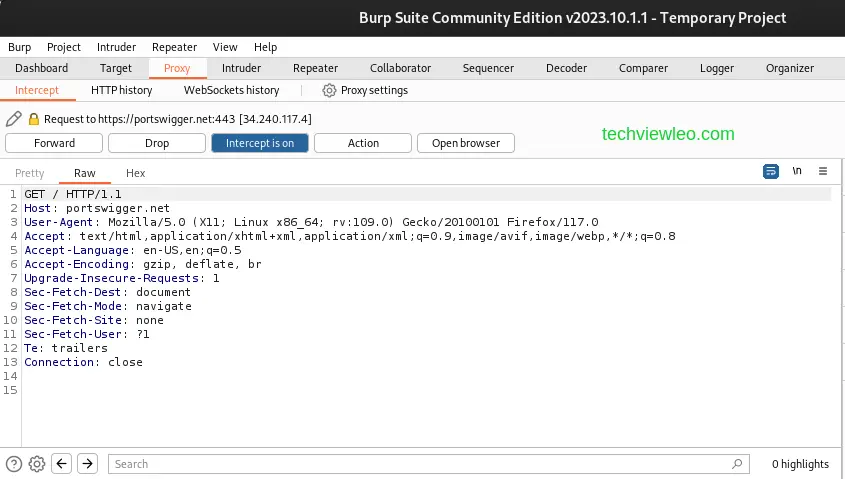
1. Intercept HTTP traffic with Burp Proxy
HTTP requests and answers transmitted between Burp’s browser and the target server can be intercepted using Burp Proxy. This enables you to examine how the website responds to various actions.
To intercept traffic using Burp, you need to ensure that intercept is on. To do this, go to Proxy>Intercept and then click on the Intercept is off button to turn intercept on.
Try to access https://portswigger.net using your browser browser and note that the page does not load. This is because the request has been intercepted and is being held by Burp.
Before the HTTP request from the browser could get to the server, Burp Proxy had already intercepted it. On the Proxy > Intercept tab, you can see this intercepted request.
From there, you can either forward the request to the intended server or drop the request. Forwarding the request will allow the page to load and wait for response from the server, but if you drop the request, it will terminate the process and the page will not load.
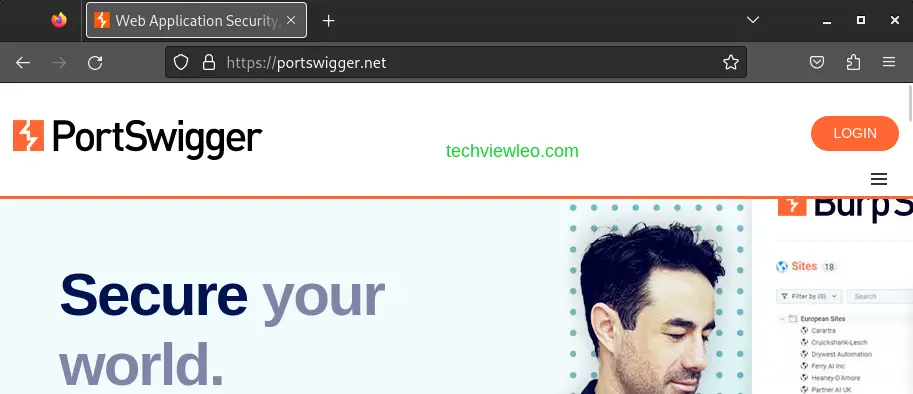
With each click in your browser, the browser sends a request to the server hosting the web application you are currently using. So, typically, the browser sends so many requests and you won’t want to intercept all of them. So, when you are done, switch of the Intercept feature to allow the browser to make requests as normal. Click on the Intercept button to turn it back off.
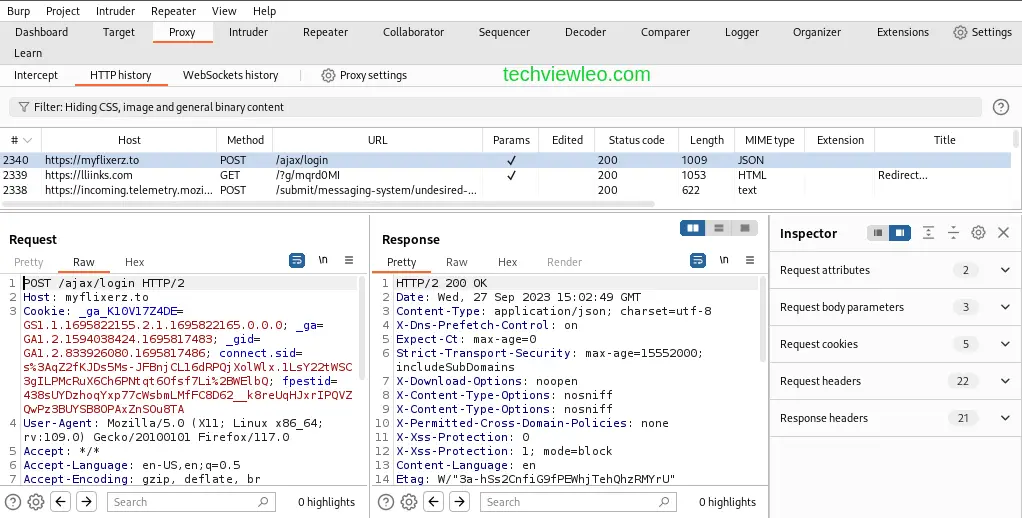
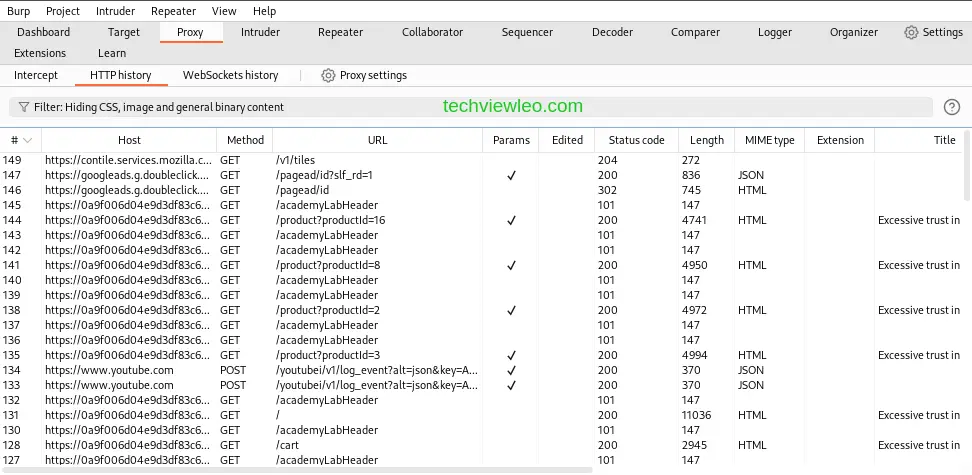
In Burp, you can also view the history of every HTTP traffic that went through Burp’s Proxy. Go to the Proxy > HTTP history tab in Burp. It displays the raw HTTP request and the server response for any entry in the history. Click on an entry to view its status.

2. Modifying HTTP requests with Burp Proxy
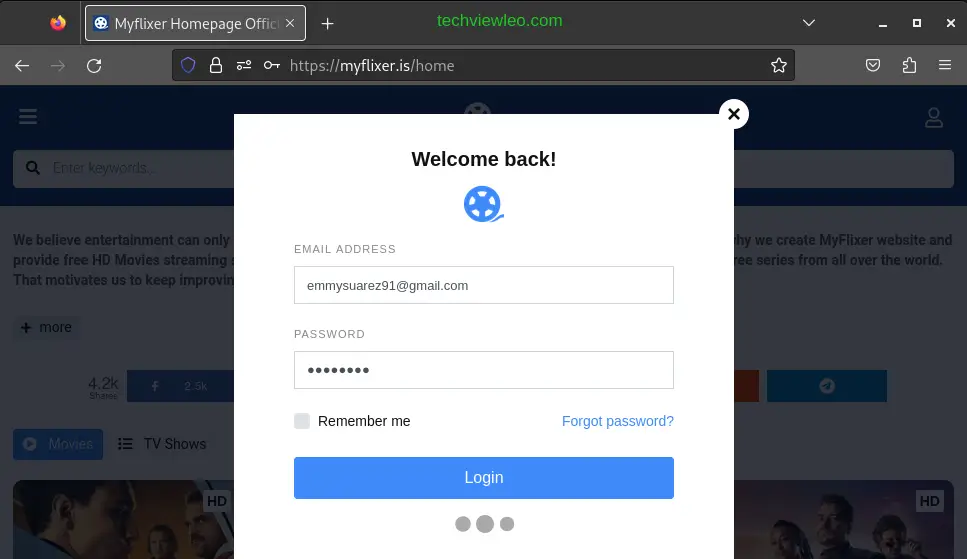
In Burp, go to the Proxy > Intercept tab and make sure that Intercept in On. To demonstrate how you can modify an HTTP request in Burp, I’ll use a simple example. Let’s head to my favorite free movie streaming site login intentionally with the wrong password. The request is intercepted and held, you can see from the three dots at the bottom, indicating that the page is still loading.
Burp Suite intercepts the requests and waits for you to forward it.
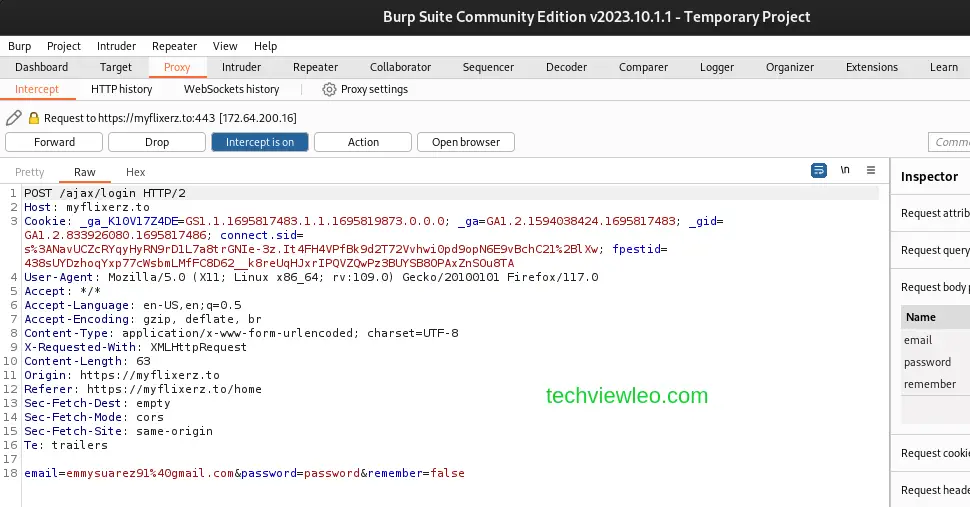
Now we can edit the password and the email, but for this case, will edit just the password, which we intentionally input to be wrong.
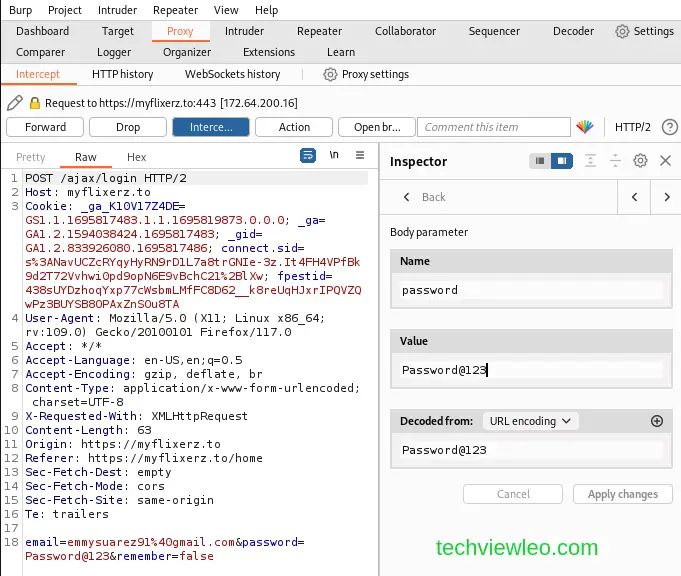
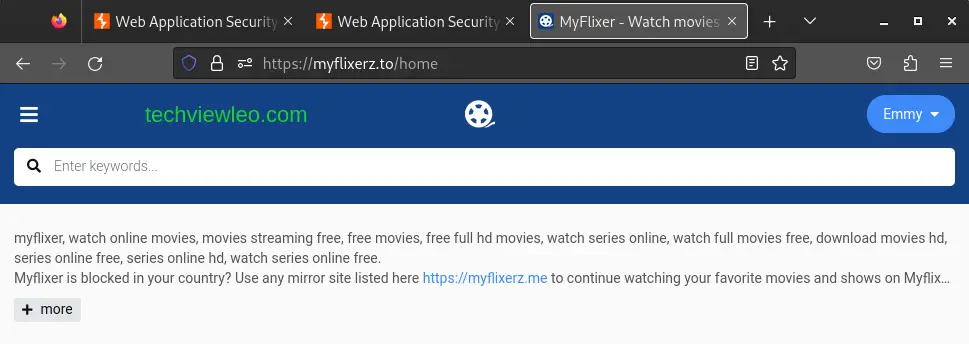
After changing the password we can forward the request and the login is successful.
This is specifically useful for client-side input validation.
3. Using Burp Intruder
Intruder is a Burp Suite tool used for automating specialized attacks on web applications. It is a tool used to complete a variety of tasks, such as checking for input-based vulnerabilities, carrying out brute-force attacks, and gathering important data and more.
When you start an attack, Burp Intruder repeatedly makes an HTTP request to the target server, while at the same time adding different payloads into already defined locations.
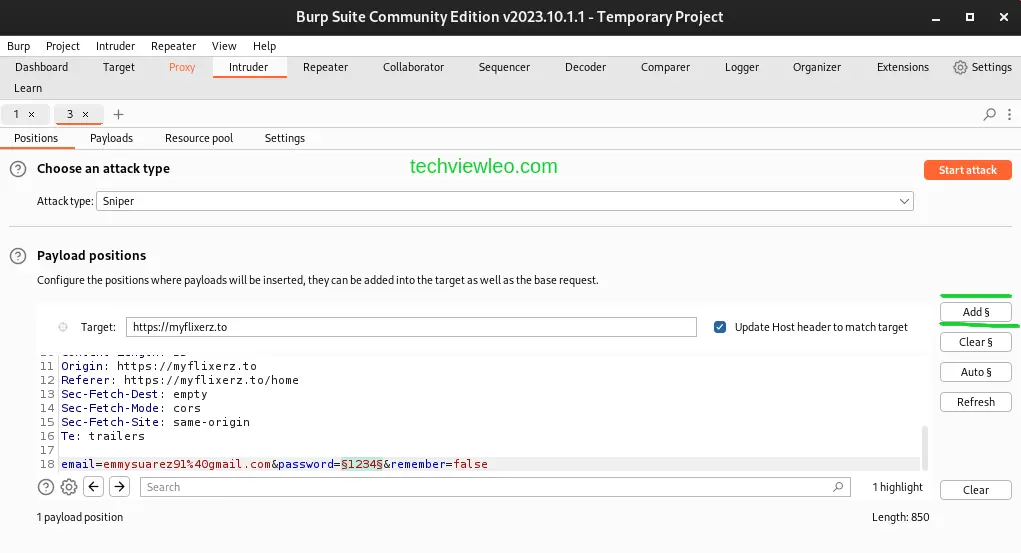
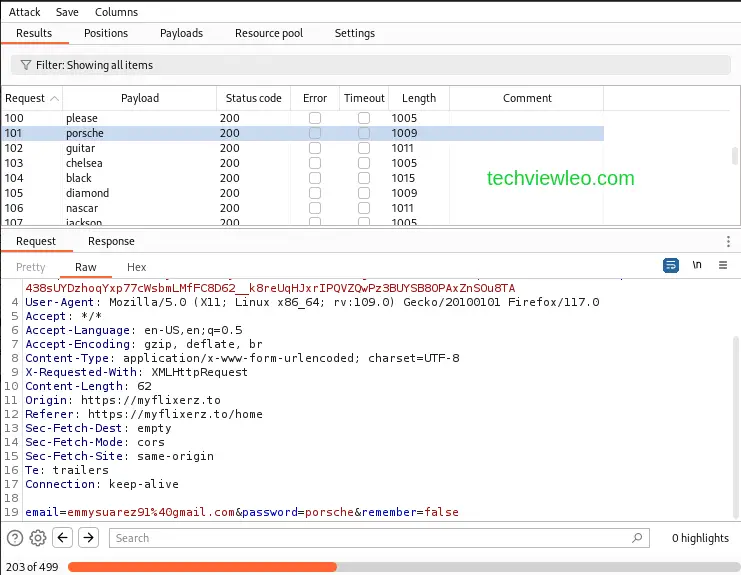
Am going to show you how to carry out a brute force attack on a web login page using Burp Intruder. The first thing you do is to click on a HTTP login entry to access the request.
Then right click on the request and click on Send to Intruder. The intruder tab will turn red, so navigate to it. While in the Intruder tab, highlight the input password and click on the Add button on your right side of the tab.
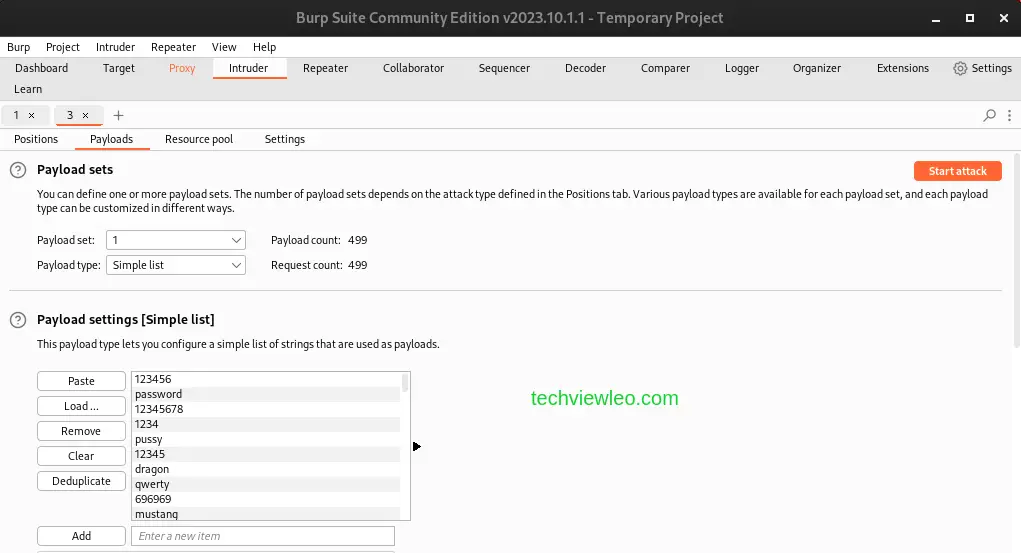
After that, navigate to the Payloads tab and to the Payload Settings [Simple List] and click on the Load button.
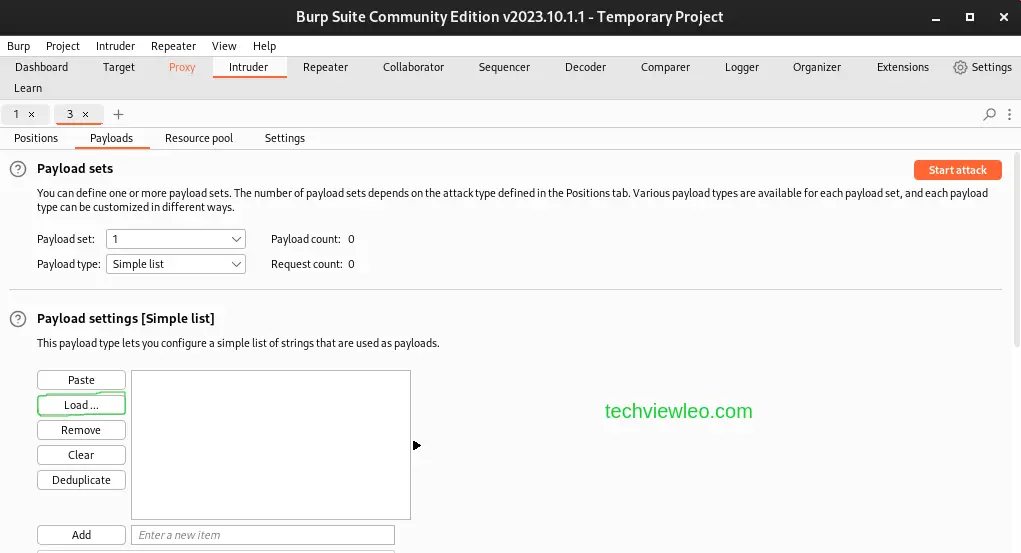
Clicking on the Load button allows you to browse for a list of predefined passwords to be used by Intruder during the attack. Kali Linux usually has a list of its own, located in /usr/share/wordlists/seclists/Passwords/Common-Credentials/.
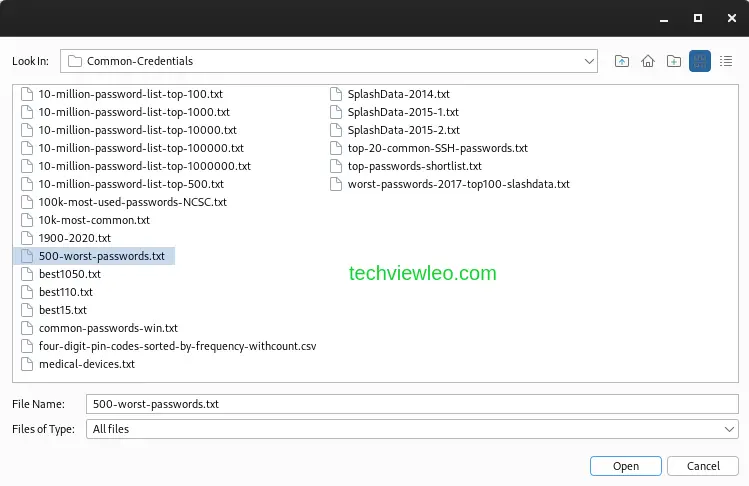
From there you can choose from a long list of categories and click Open. Now Intruder is ready to start the attack, you don’t need to do any other setting and configurations.
As soon as you launch the attack, you can take a look at each password that has been tried together with the HTTP request and sent and the response from the server.
4. Using Burp Repeater
With Burp Repeater, you can repeatedly change and deliver a specific HTTP request. This lets you study the target website’s response to different input without having to intercept the request each time.
Repeater can be used for a variety of tasks, such as sending a request with a range of parameter values to check for input-based vulnerabilities. Also, to send a series of HTTP requests in a certain order to check for vulnerabilities in multi-step procedures or vulnerabilities that depend on altering the connection state.
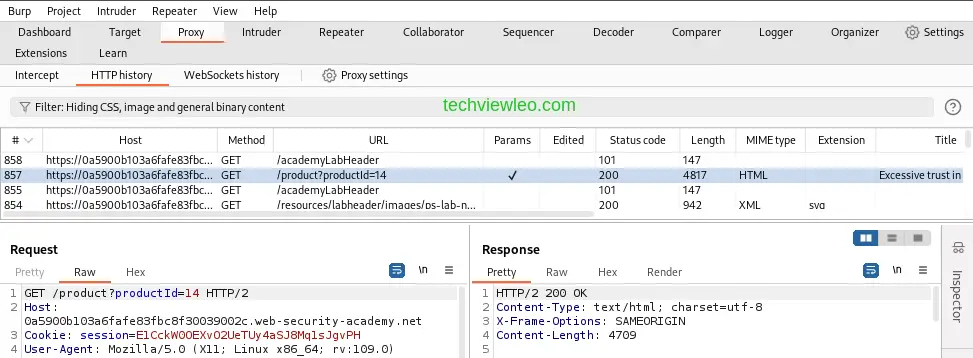
Sending a request to Burp Repeater from another Burp tool is the most popular method of using it. In this example, we’ll use Burp Proxy to submit a request from the HTTP history.
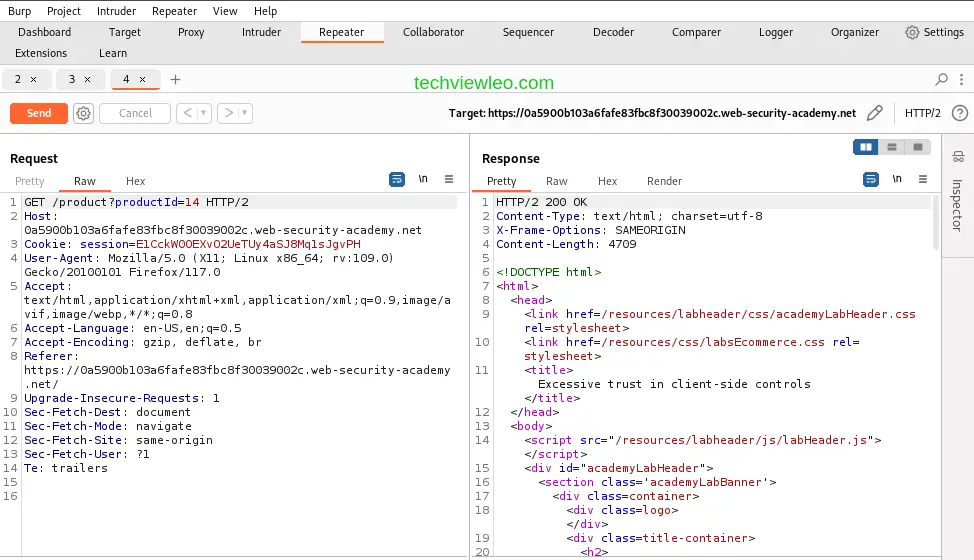
Let’s take for example the following GET request made to an online shopping website.
To use Burp Repeater, we have to send this request to Burp Repeater. Right click on the request and click on send to Repeater. This request will be forwarded to Repeater. Now navigate to the Repeater tab to send the request and view the response from the server.
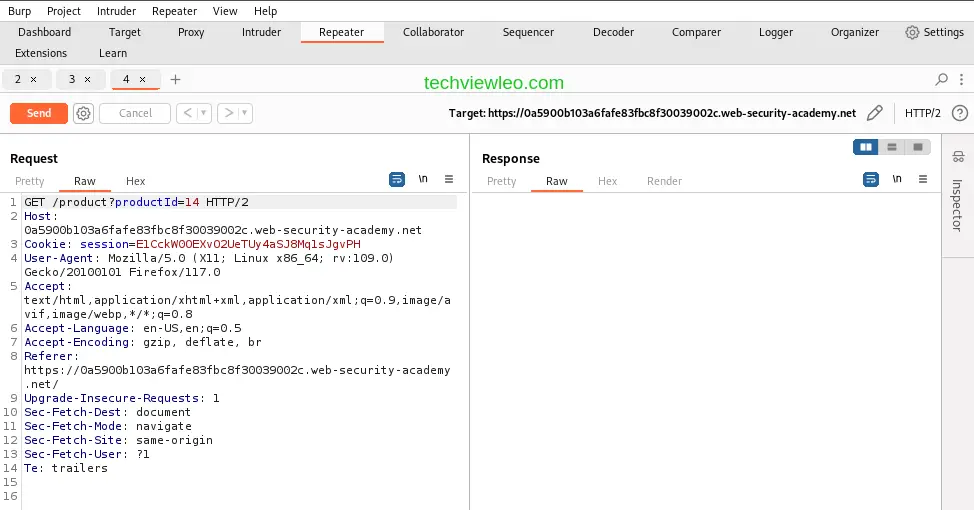
Click on the send button to send the request and view the response from the server.
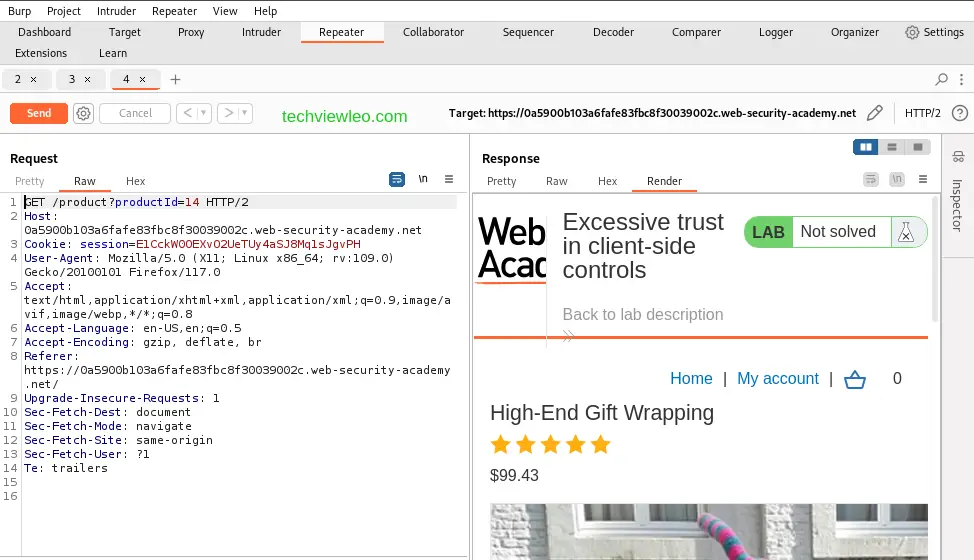
You can even go ahead and render the server’s response to confirm it’s legitimacy. Click on the render tab below the response tab.
Now, let’s try sending the same request with different inputs. You can discover and validate a number of input-based vulnerabilities by sending the same request repeatedly with varied input. This is one of the most frequent jobs you’ll complete while manual testing with Burp Suite.
We can edit the productId parameter which was initially set to 14, but we’ll change it to 214 and send the request to the server and await the response. The response of the server is a "NOT FOUND" error.
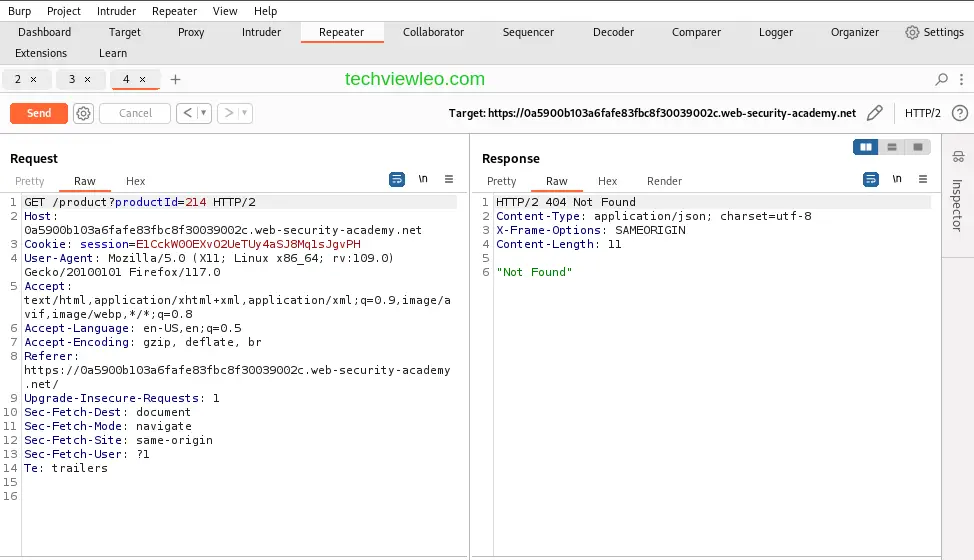
Try with a couple more numbers and see the response.
When you compare the answers’ contents, you’ll see that you may successfully request different product pages by providing their IDs, but that you’ll get a NOT FOUND response if the server cannot locate a product with the specified ID. Now that we are aware of how this page should operate, we can use Burp Repeater to see how it handles unusual input.
For unusual input, lets use a string in place of the productId and see how the server handles the input.
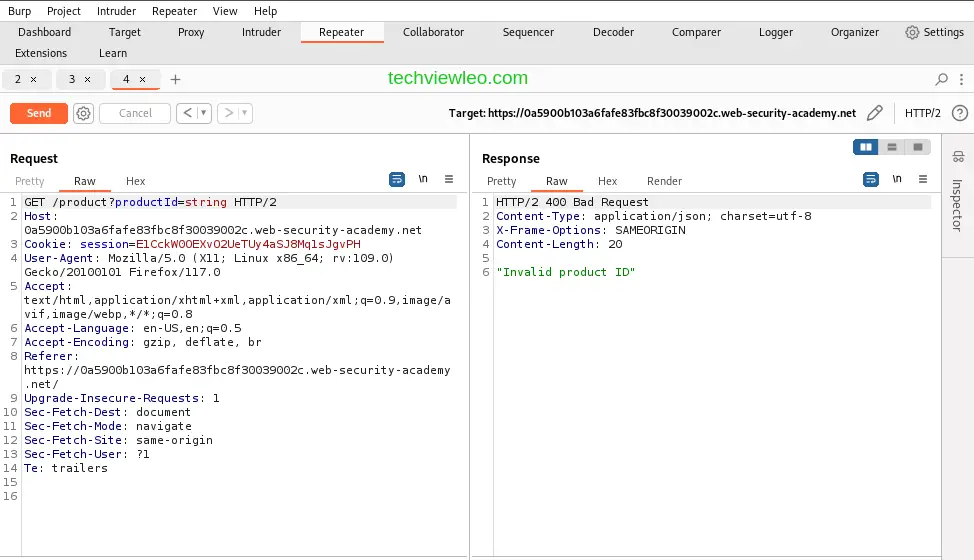
The server responds by sending an error: Invalid Product ID. This is because the server knows that the product id’s are in integer form. That brings me to the end of Burp Repeat usage.
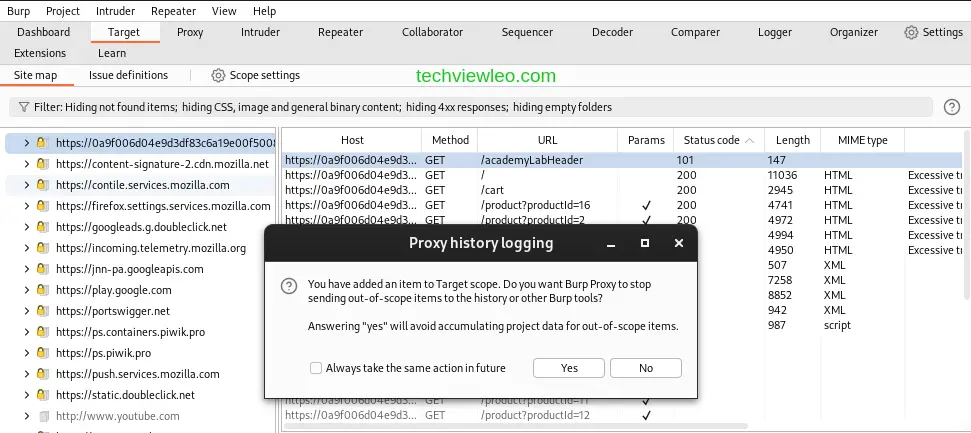
5. Setting The Target Scope
Am going to show you how to set the target scope for your project/tasks in Burp Suite in this section. Burp is specifically informed by the target scope of the URLs and sites you intend to test. By doing this, you may filter out unwanted noise produced by your browser and other websites and concentrate just on the traffic that’s relevant to you.
Now, let’s go to the HTTP history under Proxy. You can see that the HTTP history displays information on each request the browser has made, even those to websites operated by other parties in which you have no interest, including YouTube and Google Analytics.
To set the target scope, go to Target>Site Map. A list of the hosts your browser has communicated with is located in the left-hand panel. You can select Add to scope by right-clicking on the target site node. When a pop-up box asks you to exclude out-of-scope traffic, select Yes.
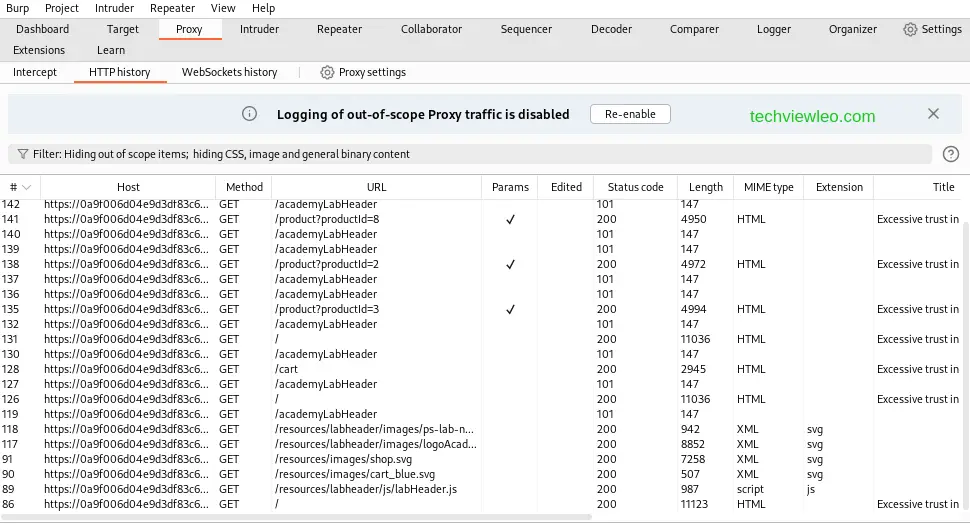
Click on the display filter above the HTTP history and select Show only in-scope items.

Check out your HTTP history by scrolling back. Observe that it is now limited to showing content from the specified website. The remaining entries have all been hidden. By limiting the history to the details you are interested in, it is substantially simplified.
That brings me to the end of this particular tutorial Understanding and Using Burp Suite. If you are a security geek, it is a vital tool when it comes to web applications, hope you enjoy.
Conclusion
Burp Suite is a valuable tool for any IT professional in Web penetration and testing. I would recommend upgrading to Burp Professional if you are a professional Web penetration tester. t offers a range of tools and resources for defensive cyber security practitioners and is designed to be fast, scalable, and easy to use.


