In building a virtual machine in OpenStack, one of the first procedures actually involves preparing a basic image of an operating system and uploading it to Glance. Glance is essentially a repository for virtual machine images that will make it simple for a user to spin up a virtual instance in a cloud infrastructure(OpenStack).
The following is a list of supported image formats by OpenStack Glance:
- raw (unstructured format)
- qcow2 (Qemu/KVM, supports Copy on Write)
- iso (archive format for optical discs; for example, CD)
- vhd (Hyper-V, common for virtual machine monitors from VMware, Xen, Microsoft, VirtualBox, and others)
- vdi (Qemu/VirtualBox)
- vmdk (VMware)
- bare (no metadata is included)
- aki/ami/ari (Amazon kernel, ramdisk, or machine image)
Mastering KVM Virtualization - The Ultimate eBook
From home labs to production clouds - master KVM Host management, automating KVM administration using Terraform, Vagrant, and cloud automation. This eBook will enable you to build scalable virtual infrastructure that works whether you're learning at home or deploying enterprise solutions. Get your full copy today
In this tutorial, you will find instructions for uploading a Qcow2 image for either RHEL 8, 9 and/or RHEL 10 to OpenStack Glance via the command line. You can expect to understand how to properly prepare your image for uploading and how to ensure your image has key properties set that are important for its successful uploading to OpenStack. The information in this guide can come in handy for those looking to ensure a uniform experience for their RHEL-based instances on OpenStack.
Step 1: Download the QCOW2 Image
The easiest and most convenient way is to use the Red Hat distributed qcow2 images offered by Red Hat.
Red Hat maintains official Red Hat Enterprise Linux cloud images. A valid Red Hat Enterprise Linux subscription is required to download these images.
Go to the Red Hat Product Downloads page and click on the dropdown menu:
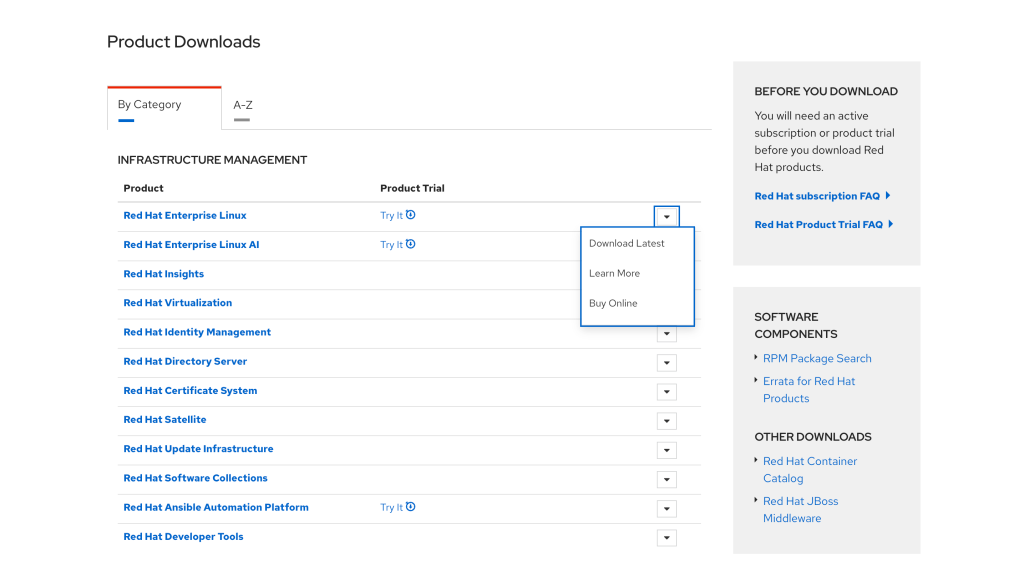
Then click ‘Download Latest‘ and then scroll down until you get to the ‘Virtualization Images‘.
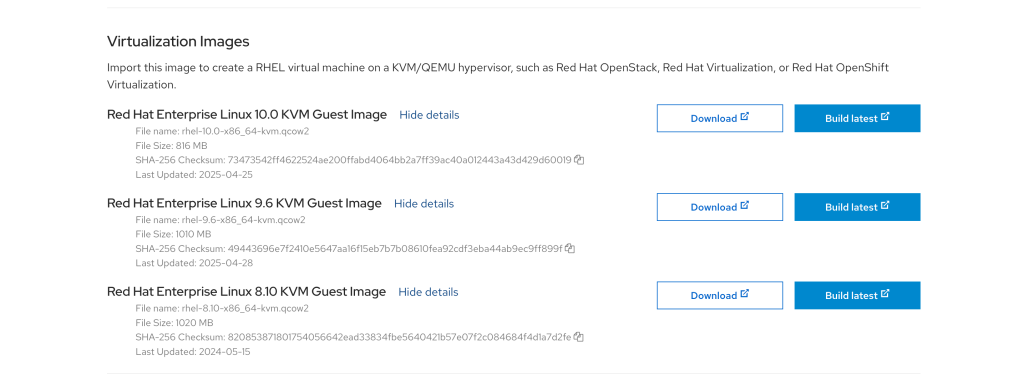
Download the images using the ‘Download‘ buttons and you should have the files as follows:
$ ls -lh
total 2.8G
-rw-r--r--. 1 cloudspinx cloudspinx  816M Oct 29 13:56 rhel-10.0-x86_64-kvm.qcow2
-rw-r--r--. 1 cloudspinx cloudspinx 1016M Oct 29 14:00 rhel-8.10-x86_64-kvm.qcow2
-rw-r--r--. 1 cloudspinx cloudspinx 1012M Oct 29 14:00 rhel-9.6-x86_64-kvm.qcow2
Step 2: Upload the QCOW2 Images
Since we are using the openstack CLI tool to upload downloaded RHEL qcow2 images to Glance. Install and configure it by following this guide:
After configuring the openstack CLI, upload the QCOW2 images to Glance with the following commands:
RHEL 10:
openstack image create  \
 --container-format bare \
 --disk-format qcow2     \
 --file rhel-10.0-x86_64-kvm.qcow2 \
 RHEL-10
RHEL 9:
openstack image create  \
 --container-format bare \
 --disk-format qcow2     \
 --file rhel-9.6-x86_64-kvm.qcow2 \
 RHEL-9
RHEL 8:
openstack image create  \
 --container-format bare \
 --disk-format qcow2     \
 --file rhel-8.10-x86_64-kvm.qcow2 \
 RHEL-8
Sample Output(RHEL 10):
+------------------+-------------------------------------------------------------------------------------------------------------------------------------------------------------------------------------+
| Field            | Value                                                                                                                                                                               |
+------------------+-------------------------------------------------------------------------------------------------------------------------------------------------------------------------------------+
| checksum         | ea5918fa116ec53f9ef1ce4be69ae2be                                                                                                                                                    |
| container_format | bare                                                                                                                                                                                |
| created_at       | 2025-10-29T12:36:42Z                                                                                                                                                                |
| disk_format      | qcow2                                                                                                                                                                               |
| file             | /v2/images/de93ac82-0395-46cb-8816-a90675ef427b/file                                                                                                                                |
| id               | de93ac82-0395-46cb-8816-a90675ef427b                                                                                                                                                |
| min_disk         | 0                                                                                                                                                                                   |
| min_ram          | 0                                                                                                                                                                                   |
| name             | RHEL-10                                                                                                                                                                             |
| owner            | 095ede96db1e48a388b40dcacb2a97b6                                                                                                                                                    |
| properties       | os_hash_algo='sha512', os_hash_value='f939fd432423bdf32f0ba1a434ce48bf197a71f8f9ff4cc5f2e724a64adaf5f5b560229b0a0347a09a13a71976cc31939cd7972f6a4df65e8081c690d06e15b0',            |
|                  | os_hidden='False', owner_specified.openstack.md5='', owner_specified.openstack.object='images/RHEL-10', owner_specified.openstack.sha256='', stores='file'                          |
| protected        | False                                                                                                                                                                               |
| schema           | /v2/schemas/image                                                                                                                                                                   |
| size             | 855506944                                                                                                                                                                           |
| status           | active                                                                                                                                                                              |
| tags             |                                                                                                                                                                                     |
| updated_at       | 2025-10-29T12:36:49Z                                                                                                                                                                |
| virtual_size     | 10737418240                                                                                                                                                                         |
| visibility       | shared                                                                                                                                                                              |
+------------------+-------------------------------------------------------------------------------------------------------------------------------------------------------------------------------------+
Confirm that the images were uploaded successfully by listing the available images:
$ openstack image list
+--------------------------------------+---------------------+--------+
| ID                                   | Name                | Status |
+--------------------------------------+---------------------+--------+
| e2e53c95-d179-4388-b56c-a1a22e604a82 | AlmaLinux-8         | active |
| 40de386b-452a-4040-ac83-6b54ae64af1d | AlmaLinux-9         | active |
| 42d663fb-006e-4033-9980-b1afa04504ff | CentOS-Stream-10    | active |
| 695da5f6-f9f2-4b58-988a-c8d3afe0e144 | CentOS-Stream-9     | active |
| ea209992-8e88-440a-9d7d-27810526a65d | Debian-11           | active |
| 229b8f23-aca0-4eaf-ac49-e459e9e4a384 | Debian-12           | active |
| ac955643-f8c8-4fd2-bf4d-b976b42a0309 | Debian-13           | active |
| de93ac82-0395-46cb-8816-a90675ef427b | RHEL-10             | active |
| c4b01fd5-52ad-48a3-b069-7d46c760952c | RHEL-8              | active |
| 434439c3-cb9f-47da-948d-8938134b6962 | RHEL-9              | active |
| c4e959b8-8543-43f9-95ee-92bcc4e554d5 | Rocky-Linux-10      | active |
| 27e71a75-2053-4418-8c1f-bee9d4542b75 | Rocky-Linux-9       | active |
| 6ea6be2b-cf9f-4695-888b-ca660989c7d9 | Ubuntu-20.04        | active |
| 4937cc33-7141-49ea-a9e1-c1844020e955 | Ubuntu-22.04        | active |
| 2db80f23-513a-4ef4-9fb7-7b811cd0355d | Ubuntu-24.04        | active |
| 5215d3a9-ac7c-4ce4-be70-cce298aab68c | Windows-Server-2022 | active |
| 0c5a775a-2913-4e36-af2a-7dc7bfc5ef55 | Windows-Server-2025 | active |
| bbd3451e-dd07-4b26-aecd-f3a50d133198 | cirros              | active |
| 43cd2ce6-44fd-4ca5-ac6c-42335238796c | openSUSE-Leap-15.6  | active |
+--------------------------------------+---------------------+--------+
Step 3: Provision RHEL Servers with the Images
From the added Glance Images, we should be able to successfully provision a instance. Let’s try creating a RHEL 10,9, and 8 server using the corresponding RHEL QCOW2 images as shown below:
RHEL 10 Server:
openstack server create \
  --flavor m1.medium \
  --network public \
  --key-name gidii \
  --image RHEL-10 \
  --security-group all \
  RHEL-10-Server
RHEL 9:
openstack server create \
  --flavor m1.medium \
  --network public \
  --key-name gidii \
  --image RHEL-9 \
  --security-group all \
  RHEL-9-Server
RHEL 8:
openstack server create \
  --flavor m1.medium \
  --network public \
  --key-name gidii \
  --image RHEL-8 \
  --security-group all \
  RHEL-8-Server
Sample Output(RHEL 10):
+-------------------------------------+------------------------------------------------------------------------------------------------------------------------------------------------------------------+
| Field | Value |
+-------------------------------------+------------------------------------------------------------------------------------------------------------------------------------------------------------------+
| OS-DCF:diskConfig | MANUAL |
| OS-EXT-AZ:availability_zone | nova |
| OS-EXT-SRV-ATTR:host | osp01.vilcom-net.co.ke |
| OS-EXT-SRV-ATTR:hostname | rhel-10-server |
| OS-EXT-SRV-ATTR:hypervisor_hostname | osp01.vilcom-net.co.ke |
| OS-EXT-SRV-ATTR:instance_name | instance-00000013 |
| OS-EXT-SRV-ATTR:kernel_id | None |
| OS-EXT-SRV-ATTR:launch_index | None |
| OS-EXT-SRV-ATTR:ramdisk_id | None |
| OS-EXT-SRV-ATTR:reservation_id | r-37eq47bc |
| OS-EXT-SRV-ATTR:root_device_name | None |
| OS-EXT-SRV-ATTR:user_data | None |
| OS-EXT-STS:power_state | N/A |
| OS-EXT-STS:task_state | None |
| OS-EXT-STS:vm_state | building |
| OS-SRV-USG:launched_at | None |
| OS-SRV-USG:terminated_at | None |
| accessIPv4 | None |
| accessIPv6 | None |
| addresses | N/A |
| adminPass | CCBGkE4gQ8FX |
| config_drive | None |
| created | 2025-10-29T12:45:01Z |
| description | None |
| flavor | description=, disk='40', ephemeral='0', , id='m1.medium', is_disabled=, is_public='True', location=, name='m1.medium', original_name='m1.medium', ram='4096', |
| | rxtx_factor=, swap='8192', vcpus='2' |
| hostId | 275ce7ad004b141c3d8f7ff119b6d4548c88e584b2d1f1a74c1ae6b2 |
| host_status | UP |
| id | 166b4da4-2478-4823-b397-1883f08cee01 |
| image | RHEL-10 (de93ac82-0395-46cb-8816-a90675ef427b) |
| key_name | gidii |
| locked | None |
| locked_reason | None |
| name | RHEL-10-Server |
| pinned_availability_zone | None |
| progress | None |
| project_id | 095ede96db1e48a388b40dcacb2a97b6 |
| properties | None |
| security_groups | name='b10d0c99-02b5-45e2-bcf0-ed02133106c4' |
| server_groups | None |
| status | BUILD |
| tags | |
| trusted_image_certificates | None |
| updated | 2025-10-29T12:45:04Z |
| user_id | 405244cf7b89468cb93e6db7f1ab0897 |
| volumes_attached | |
+-------------------------------------+------------------------------------------------------------------------------------------------------------------------------------------------------------------+List the servers available on your OpenStack cloud:
$ openstack server list
+--------------------------------------+----------------+--------+-----------------------+---------+-----------+
| ID                                   | Name           | Status | Networks              | Image   | Flavor    |
+--------------------------------------+----------------+--------+-----------------------+---------+-----------+
| a57419e4-8af8-43ee-af2e-be5450c22f69 | RHEL-8-Server  | ACTIVE | public=102.xxx.xx.186 | RHEL-8  | m1.medium |
| 585b083b-d724-4667-929d-646206fc392f | RHEL-9-Server  | ACTIVE | public=102.xxx.xx.180 | RHEL-9  | m1.medium |
| 166b4da4-2478-4823-b397-1883f08cee01 | RHEL-10-Server | ACTIVE | public=102.xxx.xx.184 | RHEL-10 | m1.medium |
+--------------------------------------+----------------+--------+-----------------------+---------+-----------+
Step 4: Connect to RHEL Server Instance over SSH
While creating the RHEL servers, we included an SSH key-pair, which was mine, and with that I can connect to the server over SSH.
The default SSH user for RHEL is cloud-user:
RHEL 10 Server:
$ ssh [email protected]
[cloud-user@rhel-10-server ~]$ cat /etc/redhat-release
Red Hat Enterprise Linux release 10.0 (Coughlan)
RHEL 9 Server:
$ ssh [email protected]
[cloud-user@rhel-9-server ~]$ cat /etc/redhat-release
Red Hat Enterprise Linux release 9.6 (Plow)
RHEL 8 Server:
$ ssh [email protected]
[cloud-user@rhel-8-server ~]$ cat /etc/redhat-release
Red Hat Enterprise Linux release 8.10 (Ootpa)
You can then register Red Hat server with a Red Hat account, and start installing software packages.
$ sudo subscription-manager register
Username: <Submit the username only>
Password: <Red Hat Customer Portal Password
Confirm the added subscription:
# RHEL 10
$ sudo subscription-manager list
+-------------------------------------------+
    Installed Product Status
+-------------------------------------------+
Product Name:   Red Hat Enterprise Linux for x86_64
Product ID:     479
Version:        10.0
Arch:           x86_64

# RHEL 9
$ sudo subscription-manager list
+-------------------------------------------+
    Installed Product Status
+-------------------------------------------+
Product Name: Red Hat Enterprise Linux for x86_64
Product ID:   479
Version:      9.6
Arch:         x86_64

# RHEL 8
$ sudo subscription-manager list
+-------------------------------------------+
    Installed Product Status
+-------------------------------------------+
Product Name: Red Hat Enterprise Linux for x86_64
Product ID:   479
Version:      8.10
Arch:         x86_64
Update your system:
sudo dnf update -y