When running a Kubernetes cluster, load distribution is a crucial part of the operation. If traffic is not distributed evenly across pods, it may lead to underperformance from the servers. Some of the pods will definitely be overloaded and some will be underutilized, which will lead to low performance, downtimes, and low scalability.
Now, this is where the load balancer comes in to save the day. A well designed load balancer can be the solution to ensure optimal application performance, high availability, and scalability. Load balancing works by distributing incoming traffic across multiple available servers to ensure better responsiveness, reliability, and scalability of applications. Requests from clients are redirected to one or more available servers based on factors such as response time, server load, and availability.
In this guide, we’ll go through the steps of configuring pfSense as a load balancer for your K8s cluster. This guide assumes that you already have a Kubernetes cluster up and running in your Network.
Step 1. Adding Virtual IP
The first thing we will do, is add a virtual IP which will be used to map the actual IP addresses of the cluster nodes. This VIP is the address that we will configure the frontend to listen on for incoming traffic.
Go to Services>DNS Resolver>General Settings and scroll down to the list of Host Overrides and add your virtual IP.

Step 2. Installing HAProxy on pfSense
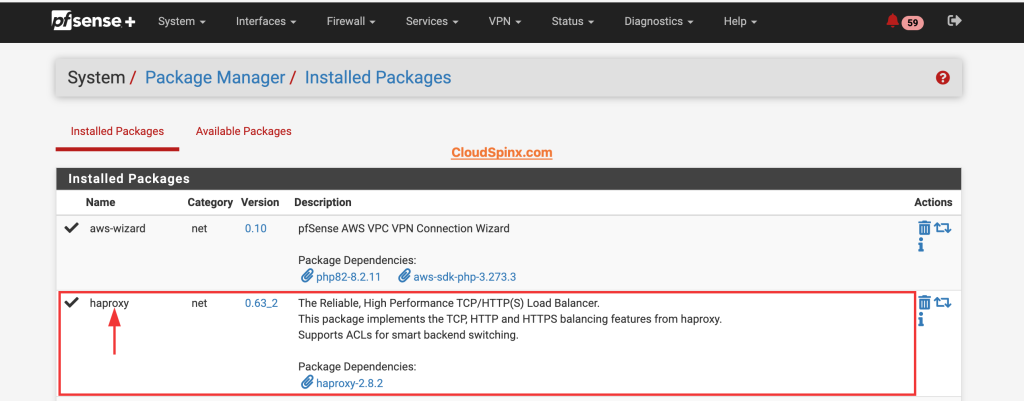
Next, we need to install HAProxy package on pfSense. HAProxy is a free and open source software for high availability load balancing and proxy services. To install the package, go to Systems>Package Manager. In the available packages tab, search for HAProxy and click on install.

Step 3. Configuring HAProxy Backend
After installing HAProxy, now it’s time to configure. To access HAProxy on pfSense, go to Services, then click on HAProxy on the drop down menu.
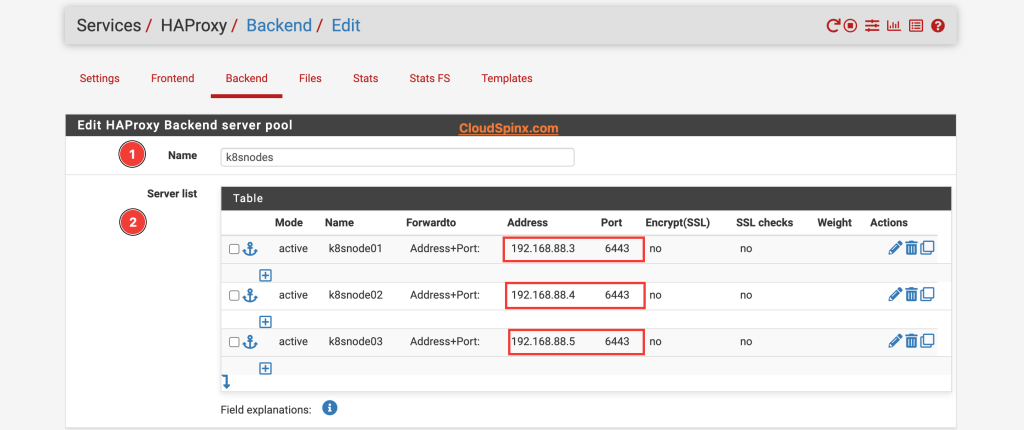
In HAProxy, we’ll start with the backend configurations, so we’ll switch to the backend tab. On the backend tab, click on the Add button to add a backend server pool for HAProxy. Add all the servers in the Kubernetes cluster, which you would like traffic to be distributed among.

Give the name of the servers and specify the actual IP addresses of the servers, and the port number 6443, which is the default port for Kubernetes API server. For the load balancing options, when multiple servers are specified, select the algorithm that best suits your setup.
Then proceed to the health check sector, select the kind of health check that you’d like HAProxy to perform on the servers to update the server states, this is very important because it will determine the state of the servers.

The HTTP protocol can also be used for HTTPS servers,but requires checking the SSL box for the servers. Everything else pretty much remains as it is, so scroll down and hit save to save and apply the configurations.
Step 4. Configuring HAProxy Frontend
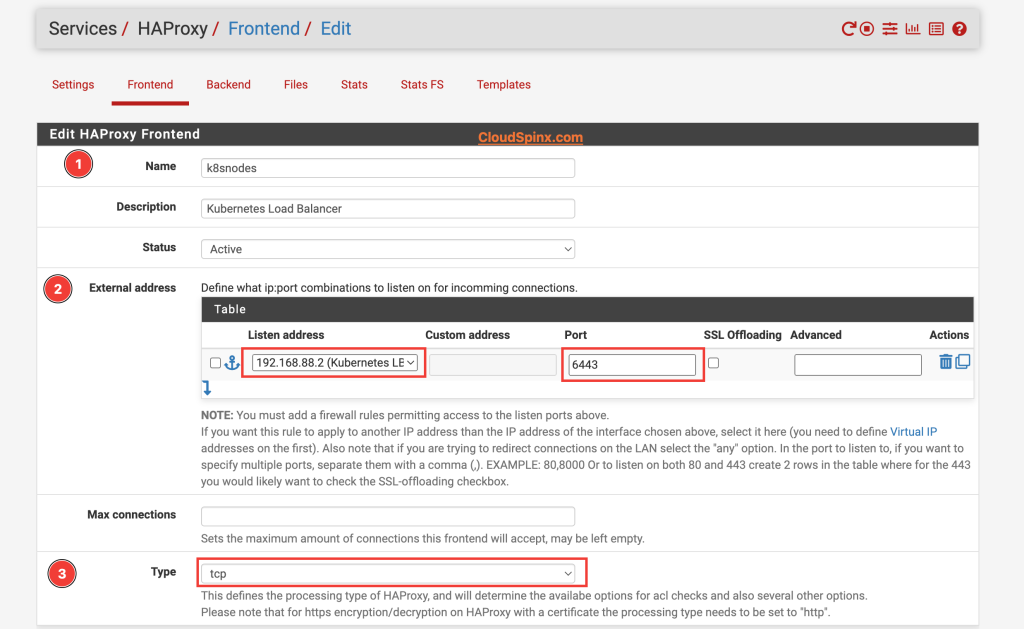
Just as we did in the backend configuration, click on the Add button to configure the frontend. Input the name, description and status for the frontend then proceed to define the IP:PORT combinations to listen on for incomming connections. This is where our Virtual IP comes in, input the virtual IP as the address and 6443 as the port number.

Select tcp as the processing type since we didn’t enable SSL Offloading. Choose the backend we configured previously as the default backend for this frontend.

Scroll down and click save then click on apply changes. As soon as the configurations are applied, you can see that the frontend now has a backend linked to it, which was not the case before.

Now, switch to the setting tab to enable HAProxy, as soon as you save the changes and apply them, HAProxy will startup, and there should be no errors.
Step 5. Testing the Load Balancer
From one node, we can modifySince the ~/.kube/config file is already configured to point to the pfSense load balancer IP instead of directly to one of the control plane nodes:
clusters:
- cluster:
    server: https://192.168.88.2:6443
Then we can run:
$ kubectl get nodes
NAME                    STATUS   ROLES           AGE   VERSION
k8snode01.xxxxxxx.net   Ready    control-plane   8d    v1.31.1
k8snode02.xxxxxxx.net   Ready    control-plane   8d    v1.31.1
k8snode03.xxxxxxx.net   Ready    control-plane   8d    v1.31.1
This command should succeed and show the nodes in your cluster, with the requests being balanced across the control plane nodes by HAProxy.
We can also se curl to make a request to the Kubernetes API server. If this is correctly routed through the load balancer, you’ll get a 403 Forbidden response, indicating the request was received but not authenticated.
$ curl -k https://192.168.88.2:6443
{
  "kind": "Status",
  "apiVersion": "v1",
  "metadata": {},
  "status": "Failure",
  "message": "forbidden: User \"system:anonymous\" cannot get path \"/\"",
  "reason": "Forbidden",
  "details": {},
  "code": 403
}%
Conclusion
This guide does not cover everything about configuring HAProxy load balancer, you can configure SSL termination to secure the connection while maintaining visibility into traffic. This kind of setup is pretty much easy to configure and ensures that traffic to the API server is distributed across the control plane nodes.


