Complete development environments can be constructed with the help of Vagrant. The “it works on my machine” justification is rendered obsolete by Vagrant’s user-friendly workflow and automation-focused approach, which also reduces setup times for development environments and improves development/production parity.
Why Vagrant?
Vagrant provides easy-to-configure, reproducible, and portable work environments built on industry-standard technologies and managed by a single consistent process in order to assist you and your team in improving performance and flexibility.
Vagrant stands on the backs of giants to do its magic. VirtualBox, KVM, VMware, Docker, and numerous providers in order to provision machines. The virtual machine can then be automatically installed and configured using industry-standard provisioning tools like shell scripts, Chef, or Puppet.
🧠 Don’t just learn KVM – master it with the best-selling eBook trusted by thousands.
Use Cases of Vagrant
- Distributed Systems Testing
- Development Environments Isolation
- Web Application Development
- Continuous Integration (CI) and Continuous Deployment (CD)
- Infrastructure as Code (IaC) Testing
- Distributed Systems Testing
- Cloud Development and Testing
- Team Collaboration
- Infrastructure as Code (IaC) Testing
In this guide, I’ll take you through Using Vagrant with VirtualBox and KVM on Debian 12. VirtualBox and KVM are the prominent providers for Vagrant. The below instructions will take you through how to use Vagrant on each thus choose your best suits.
Before we begin the installation, update your system by running:
sudo apt update && sudo apt -y full-upgrade
[ -f /var/run/reboot-required ] && sudo reboot -f
Proceed with the setup below:
Using Vagrant with VirtualBox on Debian 12
Follow the steps below to install and use Vagrant with VirtualBox on Debian 12 system.
1. Install VirtualBox on Debian 12
First, you should install VirtualBox provider before installing Vagrant. If you have not installed it, use the provided link below to install it.
When you finish the installation, jump to the next step.
2. Install Vagrant on Debian 12
Begin, by Installing the following repository dependencies:
sudo apt -y install apt-transport-https ca-certificates curl software-properties-commonNext, import repository GPG keys:
wget -O- https://apt.releases.hashicorp.com/gpg | gpg --dearmor | sudo tee /usr/share/keyrings/hashicorp-archive-keyring.gpgNow, the official Vagrant APT repository on your Debian 12 system.
echo "deb [signed-by=/usr/share/keyrings/hashicorp-archive-keyring.gpg] https://apt.releases.hashicorp.com $(lsb_release -cs) main" | sudo tee /etc/apt/sources.list.d/hashicorp.listAfter you’ve added the repo, you can install Vagrant by executing:
sudo apt update
sudo apt install vagrant
Verify the version installed.
$ vagrant --version
Vagrant 2.4.0
3. Using Vagrant on Debian 12
We want to demonstrate how to use Vagrant by setting up a development environment at this stage. You have to create the file in which you wish to save the Vagrant file.
mkdir ~/vagrant-projectNext, you have to choose the box you want to utilize on Debian 12 and establish a new Vagrantfile. Vagrant environments use boxes, which are provider-specific package formats.
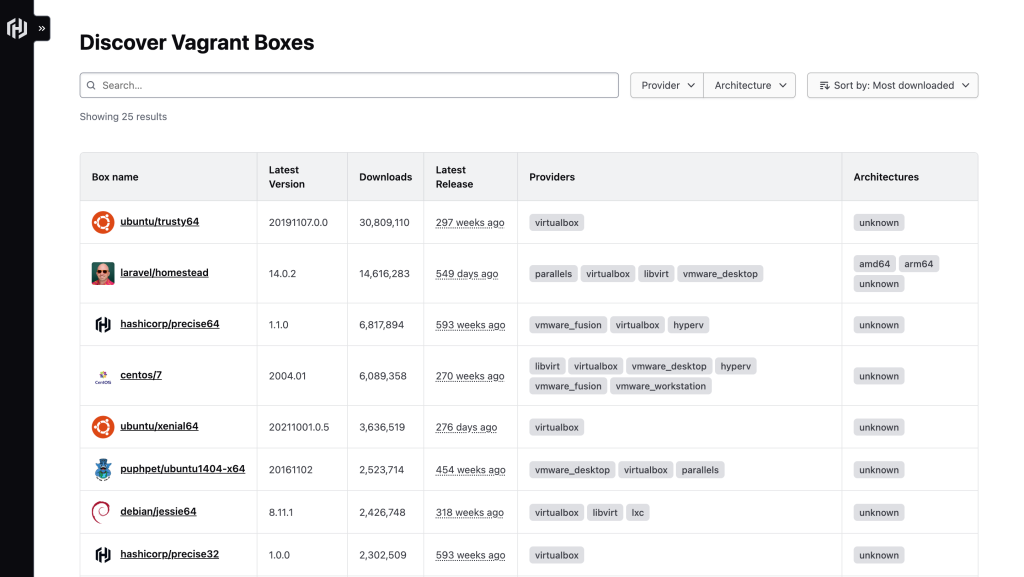
You can visit the official website of Vagrant Catalog page to select the box.

For this demo, I’ll select generic/ubuntu2204.
Now, run the following command to create the Vagrantfile:
cd ~/vagrant-project
vagrant init generic/ubuntu2204
You’ll see the below output:
A `Vagrantfile` has been placed in this directory. You are now
ready to `vagrant up` your first virtual environment! Please read
the comments in the Vagrantfile as well as documentation on
`vagrantup.com` for more information on using Vagrant.
Using your preferred text editor, open the Vagrantfile on Debian 12 and make the necessary modifications.
sudo vim VagrantfileTo create and set up the virtual machine according to its definition in the Vagrantfile, execute the next command:
vagrant upSample output:
Bringing machine 'default' up with 'virtualbox' provider...
==> default: Box 'generic/ubuntu2204' could not be found. Attempting to find and install...
    default: Box Provider: virtualbox
    default: Box Version: >= 0
==> default: Loading metadata for box 'generic/ubuntu2204'
    default: URL: https://vagrantcloud.com/api/v2/vagrant/generic/ubuntu2204
==> default: Adding box 'generic/ubuntu2204' (v4.3.6) for provider: virtualbox (amd64)
    default: Downloading: https://vagrantcloud.com/generic/boxes/ubuntu2204/versions/4.3.6/providers/virtualbox/amd64/vagrant.box
    default: Calculating and comparing box checksum...
==> default: Successfully added box 'generic/ubuntu2204' (v4.3.6) for 'virtualbox (amd64)'!
==>      ......................
Virtualbox is the default provider used by Vagrant, therefore you can view the running virtual machine from the VirtualBox management.
Access Virtual machines
Through SSH, you can establish a connection and access the virtual machines that are currently operating. Use this command to SSH into the Vagrant box that is currently running:
vagrant ssh- To display the status of Virtual machines use:
vagrant status- To display the status of all Virtual environments run:
vagrant global-status- To shut down a virtual machine, use:
$ vagrant halt
==> default: Attempting graceful shutdown of VM...
    default:
    default: Vagrant insecure key detected. Vagrant will automatically replace
    default: this with a newly generated keypair for better security.
    default:
    default: Inserting generated public key within guest...
    default: Removing insecure key from the guest if it's present...
default: Key inserted! Disconnecting and reconnecting using new SSH key...- To hibernate VM.
$ vagrant suspend
==> default: Saving VM state and suspending execution...- Restore the VM to its original state by clearing all data.
$ vagrant destroy
default: Are you sure you want to destroy the 'default' VM? [y/N] y
==> default: Discarding saved state of VM...
==> default: Destroying VM and associated drives...
Using Vagrant with KVM on Debian 12
We have seen how to use Vagrant with VirtualBox. In this step, we shall see how to use it with KVM. Stay tuned to get enlightened.
1. Install KVM on Debian 12
Use our link below to install KVM on Debian 12 machine.
Add User to the ‘libvirt’ Group:
sudo usermod -a -G libvirt <yourusername>Once you’ve installed the KVM provider, the next step is to install Vagrant. Since we have already installed it, we shall proceed to the next step.
2. Install vagrant-libvirt plugin
You must install the vagrant-libvirt plugin before you can use KVM to operate Vagrant virtual machines. By adding the Libvirt provider to Vagrant, this plugin enables Vagrant to use Libvirt for machine control and provisioning.
To use the vagrant-libvirt plugin, install the required dependencies.
sudo apt install build-essentialNow, run the next command to install the vagrant-libvirt plugin:
vagrant plugin install vagrant-libvirtYou must also install the vagrant-mutate plugin, which changes vagrant boxes to work with various providers.
vagrant plugin install vagrant-mutate3. Use Vagrant With Libvirt KVM Provider
Check that the Vagrant box you wish to use supports the libvirt provider. Simply choose the “libvirt” option in the Vagrant Cloud repository to find vagrant boxes supported by libvirt.
vagrant-01.png
Throughout this tutorial, I’ll be using a CentOS 9 box.
Navigate to the directory of your Vagrant project and set up the Vagrant environment:
mkdir my_vagrant
cd my_vagrant
vagrant init generic/centos9s
After that, execute the subsequent command to launch the virtual machine:
vagrant up --provider=libvirtIn this case, the –provider=libvirt option specifically instructs Vagrant to run the virtual machine using libvirt KVM. This means that KVM serves as the default provider.
Sample output:
Bringing machine 'default' up with 'libvirt' provider...
==> default: Box 'generic/centos9s' could not be found. Attempting to find and install...
    default: Box Provider: libvirt
    default: Box Version: >= 0
==> default: Loading metadata for box 'generic/centos9s'
    default: URL: https://vagrantcloud.com/generic/centos9s
==> default: Adding box 'generic/centos9s' (v4.3.12) for provider: libvirt
    default: Downloading: https://vagrantcloud.com/generic/boxes/centos9s/versions/4.3.12/providers/libvirt/amd64/vagrant.box
    default: Calculating and comparing box checksum...
==> default: Successfully added box 'generic/centos9s' (v4.3.12) for 'libvirt'!
==> default: Uploading base box image as volume into Libvirt storage...
==> default: Creating image (snapshot of base box volume).
==> default: Creating domain with the following settings...
==> default:  -- Name:              my_vagarant_default
==> default:  -- Description:       Source: /home/techviewleo/my_vagarant/Vagrantfile
==> default:  -- Domain type:       kvm
==> default:  -- Cpus:              2
==> default:  -- Feature:           acpi
==> default:  -- Feature:           apic
==> default:  -- Feature:           pae
==> default:  -- Clock offset:      utc
==> default:  -- Memory:            2048M
==> default:  -- Base box:          generic/centos9s
==> .........................
It is also possible to add the following environment option to instruct Vagrant to use libvirt as the default provider indefinitely.
export VAGRANT_DEFAULT_PROVIDER=libvirtNow, use a KVM management GUI program like Virt-manager to confirm it.
- Perform the following actions to restart a virtual machine (VM):
vagrant reload- To list Vagrant boxes.
vagrant box list- To verify if a Vagrant box is outdated.
cd my_vagrants/
vagrant box outdated- To update Vagrant boxes.
vagrant box update- If you want to download a Vagrant box, run:
vagrant box add <box>- To View the size of Vagrant boxes run:
ls ~/.vagrant.d/boxesVerdict
Throughout this guide, we have seen how to use Vagrant in VirtualBox and KVM providers. Vagrant, when combined with VirtualBox and KVM, gives users the ability to establish reliable and segregated environments for development and testing.
Check out more articles:


