K3s is an open-source lightweight certified Kubernetes distro built for production operations. It is a single compressed binary of about 50 MB and uses a memory of about 250MB.
K3s is a single process with integrated Kubernetes master, kubelet, and containerd and uses SQLite database in addition to etcd. It was simultaneously released for x86_64, ARM64, and ARMv7.
K3s was made by Rancher built for IoT and Edge computing. It is ideal for IoT, Edge, CI, ARM, Development, and Embedding k8s
Features of k3s
- It is packaged as a single 50MB binary file.
- Has sqlite3 as the default storage mechanism but still supports etcd3, MySQL, and Postgres.
- Has a simple launcher that handles complexity of TLS and options.
- It is very secure.
- It is simple but powerful.
- Operates on minimized external dependencies.
- It is highly available and designed for production workloads in remote locations.
- It is optimized for ARM supporting both Both ARM64 and ARMv7.
How K3s works?
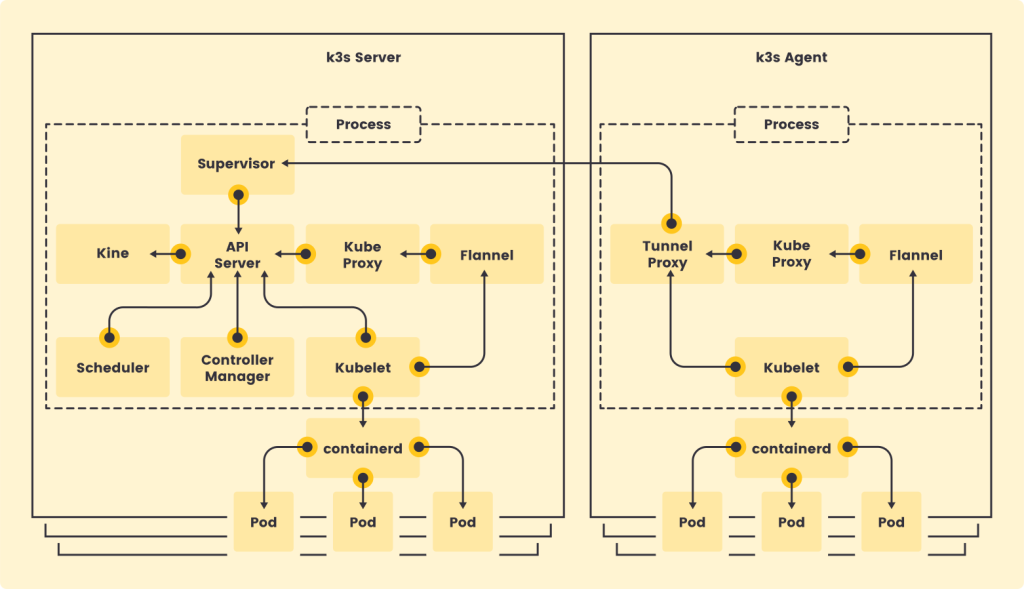
I will illustrate how K3s works with a simple diagram below.

- The machine that runs the k3s server is called the server node and the machine running the k3s Agent is called a worker node.
- The API server validates and configures data for the API objects e.g pods, services, etc.
- The Controller Manager watches the shared state of the cluster through the API-Server, makes changes to it, and moves the current state towards the desired state.
- The Scheduler assigns pods to Nodes according to their validity, constraints, and available resources.
- The Kubelet is the primary node agent that runs on every node. It registers nodes with API Server based on their hostname, flags, or specific logic.
The communication is done from the Agent to the server through a tunneling proxy.
Common use cases of k3s
K3s is used in the following cases.
- It is used in Edge Computing and Embedded Systems.
- It is used in IoT (Internet of Things)Gateway.
- It is used by developers in CI (Continuous Integration) environments.
- It is used in Single-App Clusters.
With the brief background on k3s, we now focus on the Installation of k3s on the Rocky Linux server. When k3s is used alongside Rancher, k3s is simple to install lightweight yet highly available.
K3s installation on Rocky Linux Requirements
- K3s supported architectures: x86_64, ARMv7, ARM 64
- Your nodes must not have the same hostname.
- k3s supports most modern Linux Systems. Check specific requirements for some linux distros on official site.
- Minimum RAM of 1GB ,with preffered being 512MB.
- CPU : 1 minimum.
- Disks : preferred SSD disk.
- Port 6443 must be accessible by all nodes.
- A database : PostgreSQL, MySQL, etcd
K3s can be installed in the system as a systemd script, from a binary file, or using a configuration file.
Define your hosts in the /etc/hosts file of each server.
$ sudo vim /etc/hosts
192.168.201.2 k3s-master
192.168.201.3 k3s-worker02 # Worker machine 1
192.168.201.4 k3s-worker01 # Worker machine 2
Install k3s on the master node
To install k3s on the master node visit the k3s website and copy the script. Then carry the steps below.
Step 1 : Update your system
This is the best practice before any installation.
sudo dnf update -yThen confirm your system architecture to ensure its either x86_64, ARMv7, or ARM 64
uname -aStep 2 : Run k3s installation script
To install k3s on the master node run the script:
curl -sfL https://get.k3s.io | sh -Installation output:
[INFO]  Finding release for channel stable
[INFO]  Using v1.30.3+k3s1 as release
[INFO]  Downloading hash https://github.com/k3s-io/k3s/releases/download/v1.30.3+k3s1/sha256sum-amd64.txt
[INFO]  Downloading binary https://github.com/k3s-io/k3s/releases/download/v1.30.3+k3s1/k3s
[INFO]  Verifying binary download
[INFO]  Installing k3s to /usr/local/bin/k3s
[INFO]  Finding available k3s-selinux versions
Rancher K3s Common (stable)
...
Created symlink /etc/systemd/system/multi-user.target.wants/k3s.service → /etc/systemd/system/k3s.service.
[INFO]  systemd: Starting k3s
From the output, other important utilities were installed:
- kubectl
- crictl
- k3s-killall.sh
- k3s-uninstall.sh
Since this is a systemd script install, start and enable the service:
sudo systemctl enable --now k3s
sudo systemctl status k3s
The status output:
● k3s.service - Lightweight Kubernetes
   Loaded: loaded (/etc/systemd/system/k3s.service; enabled; vendor preset: dis>
   Active: active (running) since Fri 2024-08-09 19:54:55 UTC; 59s ago
     Docs: https://k3s.io
 Main PID: 22804 (k3s-server)
    Tasks: 101
   Memory: 1.3G
   CGroup: /system.slice/k3s.service
           ├─22804 /usr/local/bin/k3s server
           ├─22821 containerd
           ├─23532 /var/lib/rancher/k3s/data/9d8f9670e1bff08a901bc7bc270202323f>
           ├─23566 /var/lib/rancher/k3s/data/9d8f9670e1bff08a901bc7bc270202323f>
           ├─23593 /var/lib/rancher/k3s/data/9d8f9670e1bff08a901bc7bc270202323f>
           ├─24733 /var/lib/rancher/k3s/data/9d8f9670e1bff08a901bc7bc270202323f>
           └─24841 /var/lib/rancher/k3s/data/9d8f9670e1bff08a901bc7bc270202323f>
To check the k3s version installed.
$ k3s --version
k3s version v1.30.3+k3s1 (f6466040)
go version go1.22.5
The kubectl version command might throw an error “Unable to read /etc/rancher/k3s/k3s.yaml, please start the server with –write-kubeconfig-mode to modify kube config permissions“
Copy the file.
mkdir -p ~/.kube
sudo cp /etc/rancher/k3s/k3s.yaml ~/.kube/config
sudo chown $USER:$USER ~/.kube/config
You have successfully installed k3s on the master node using the systemd script install. To list your nodes in the cluster run:
$ kubectl get nodes
NAME                    STATUS   ROLES                  AGE    VERSION
rocky8.cloudspinx.com   Ready    control-plane,master   7m9s   v1.30.3+k3s1
Install k3s on worker nodes
To install k3s on worker nodes and add them to your cluster, run the installation script with the K3S_URL and K3S_TOKEN environment variables.
The K3S_TOKEN can be accessed on /var/lib/rancher/k3s/server/node-token on the control-plane,master node server.
$ sudo cat /var/lib/rancher/k3s/server/node-token
K108a2420739e1fcfeae17fd4c7887daf9995631ff69b90cf5547ab174659cf2e80::server:b6fd4541317104cc20e931bd344105eb
To install k3s on the worker node :
curl -sfL https://get.k3s.io | K3S_URL=https://<SERVER_IP-ADDR>:6443 K3S_TOKEN=<TOKEN FROM MASTER NODE> sh -To install k3s on the Fedora and Ubuntu servers from the master node.
curl -sfL https://get.k3s.io | K3S_URL=https://192.168.201.2:6443 The next worker node is my Fedora server 192.168.201.3
curl -sfL https://get.k3s.io | K3S_URL=https://192.168.201.2:6443 Once installation of k3s on worker nodes is finished, login to the master node and check the status.
$ k3s kubectl config get-clusters
NAME
default

$ k3s kubectl get nodes
NAME                         STATUS   ROLES                  AGE   VERSION
fedora-client                Ready    k3s-worker02           19m   v1.30.3+k3s1
rocky-linux-01.localdomain   Ready    control-plane,master   36m   v1.30.3+k3s1
ubuntu-server                Ready    k3s-worker01           15m   v1.30.3+k3s1

$ k3s kubectl cluster-info
Kubernetes master is running at https://127.0.0.1:6443
CoreDNS is running at https://127.0.0.1:6443/api/v1/namespaces/kube-system/services/kube-dns:dns/proxy
Metrics-server is running at https://127.0.0.1:6443/api/v1/namespaces/kube-system/services/https:metrics-server:/proxy

$ k3s kubectl get namespaces
NAME              STATUS   AGE
default           Active   45m
kube-system       Active   45m
kube-public       Active   45m
kube-node-lease   Active   45m

$ k3s kubectl get endpoints -n kube-system
NAME                    ENDPOINTS                                  AGE
metrics-server          10.42.0.5:443                              47m
traefik                 10.42.0.7:8000,10.42.0.7:8443              47m
kube-dns                10.42.0.3:53,10.42.0.3:53,10.42.0.3:9153   47m
rancher.io-local-path   <none>                                     47m

$ k3s kubectl get pods -n kube-system
NAME                                      READY   STATUS      RESTARTS   AGE
local-path-provisioner-5ff76fc89d-c4lwm   1/1     Running     0          49m
metrics-server-86cbb8457f-cc4fp           1/1     Running     0          49m
helm-install-traefik-crd-7nbxl            0/1     Completed   0          49m
helm-install-traefik-hk9d4                0/1     Completed   1          49m
svclb-traefik-2jn6j                       2/2     Running     0          49m
traefik-97b44b794-p2cpk                   1/1     Running     0          49m
coredns-7448499f4d-mh8lm                  1/1     Running     0          49m
svclb-traefik-7rxjr                       2/2     Running     0          33m
svclb-traefik-dspv9                       2/2     Running     0          28m

## To see running containers from the worker node ###
$ sudo crictl ps
CONTAINER           IMAGE               CREATED             STATE               NAME                ATTEMPT             POD ID
336eeccf43144       465db341a9e5b       36 minutes ago      Running             lb-port-443         0                   dc0d37d9f171d
54df7f98fca04       465db341a9e5b       36 minutes ago      Running             lb-port-80          0                   dc0d37d9f171d
That concludes the installation of k3s master and worker nodes. With your environment now ready you can proceed to create your project and deploy it. Keep checking our guides.
How To Uninstall K3s on Rocky Linux
Installation of k3s via installation script creates a script to uninstall k3s from your system.
To uninstall k3s from the server/master node:
sudo /usr/local/bin/k3s-uninstall.shTo uninstall k3s from the agent/worker node:
sudo /usr/local/bin/k3s-agent-uninstall.shConclusion
That concludes our article on how to Run Kubernetes Cluster on Rocky Linux using k3s. Please check k3s official website for more information. We hope the article is informative.


